

If you’re looking to add Google Analytics to your GeneratePress website, there are several options.
These are the best methods (no particular order):
Methods to add install the Google Analytics trackings script
The best method will depend on a few factors, such as:
- Whether you’re using the premium version
- If you want to self-host the tracking script or
Installing Google Analytics without a plugin
If you’re a speed freak (like I am) you might want to avoid installing a separate plugin just to add a simple Javascript tracking script to your site.
Thanks to GeneratePress Theme Hooks, we can easily enqueue the script on every page (or specific pages using conditional hooks).
If you have GeneratePress premium, you’ll use the GP Hooks Element. If you’re using the free version, you’ll have to use PHP.
Method 1: GeneratePress Hook Element (premium)
Note: to use this method you must have GeneratePress premium installed and the Elements module activated.
Add Google Analytics using the GeneratePress Hooks Element
1. Create a new hook element

From the dashboard, go to Appearance > Elements. Then click Add New to create a new element.
2. Select ‘Hook’ as the Element Type
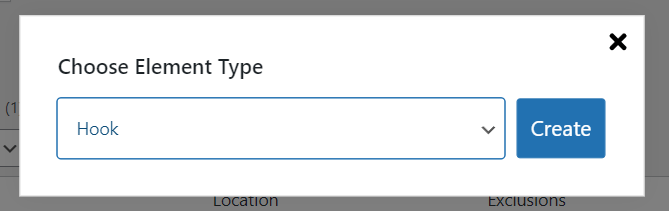
Choose Hook as the Element Type
3. Add a title and paste the tracking script
Give your Hook a descriptive title like ‘Install Google Analytics’. Then paste the tracking code provided in your analytics account panel.
4. Choose wp_head as the hook location
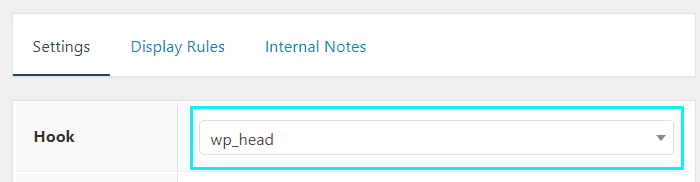
Connect your hook to the hook location wp_head
5. Set the Display Rules
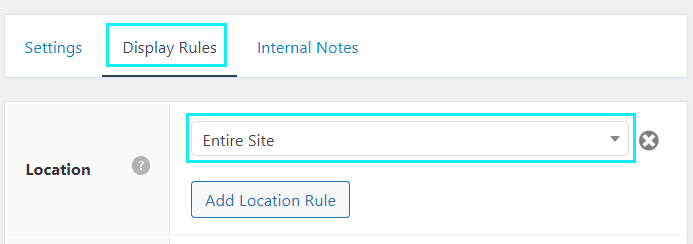
Choose where you which pages you want the tracking code to be inserted on. The most common option is ‘Entire Site’ but you could also exclude it from specific pages or categories using the conditional hooks.
Method 2: Use PHP (Free version)
If you’re using the free version of GeneratePress, you can still access theme hooks using PHP snippets. You can add this code in your functions.php file or via code snippets.
Note: Make sure to use the actual tracking code provided in your account panel. This is just an example.
Paste the code below (replace the section between the ?> and <?php tags):
function btw_google_analytics() { ?>

    <!-- Replace this section below -->

<script async src="https://www.googletagmanager.com/gtag/js?id=G-XXXXXXXXX"</script>
<script>
  window.dataLayer = window.dataLayer || [];
  function gtag(){dataLayer.push(arguments);}
  gtag('js', new Date());

  gtag('config', 'G-XXXXXXXXX');
</script>

<?php
}

add_action( 'wp_head', 'btw_google_analytics');Code language: PHP (php)
Install Google Analytics with a plugin
You can also use a plugin to add Google Analytics to GeneratePress. There are several reasons you might prefer this method.
Reasons to use a plugin:
- Easier to setup
- You can host the tracking script locally (pagespeed)
- Works with the free version of GeneratePress
What is ‘Locally Hosted’ analytics?
Ordinarily, Google Analytics is added via a 3rd-party tracking script hosted on Google’s servers. It loads quite fast, but not as fast as hosting the script yourself. This can hurt your pagespeed and GTMetrix scores slightly.
Several plugins let you host the script ‘locally’ on your own web server. The plugin automatically updates the tracking code via a cron-job so it’s always the latest version. I use locally hosted analytics (FlyingAnalytics) here at BTW, and it works great.
Recommended Plugins:
These are the best plugins for installing Google Analytics on GeneratePress (in order).
- FlyingAnalytics (local hosting option)
- CAOS Host Google Analytics Locally (local hosting)
- Site Kit (official Google plugin)
- GA Google Analytics
How to add Google Analytics with FlyingAnalytics
FlyingAnalytics is my preferred analytics plugin for GeneratePress. It makes self-hosted analytics a snap. Here’s how to set it up.
- Install & Active Flying Analytics
- Go to Dashboard > Settings > Flying Analytics
- Add your Google Analytics tracking ID
- Choose which tracking script to use
- Disable tracking for Admins (recommended)

Which Javascript tracking method to use?
You can choose exactly which version of the tracking script to use. Each has different capabilities (more features = heavier script).
If you’re using GA4 you have to choose the Gtag v4 option. Universal Analytics properties can use any of the other options.
- Gtag v4: For Google Analytics v4 properties
- Gtag: Advanced tracking for Universal Analytics
- Analytics.js: Standard Universal Analytics (includes event tracking)
- Minimal Analytics: Basic pageview tracking. Ultra-light. (no events)
- Minimal Analytics inlined: The javascript is inlined in the
<head>, rather than enqueuing a separate JavaScript file.
For my own site I use Analytics.js which is a good balance of features and performance.
Setup instructions for other plugins:
Below you’ll find step-by-step setup guides for other popular Google Analytics plugins:
Make sure it’s working
The final step is to test your tracking script to make sure it’s working. It can take a little while for data to start coming in, but it often begins working immediately for real-time tracking.
Steps to test Google Analytics is working:
- Clear your site’s cache plugin
- Clear your CDN/Cloudflare (if using one)
- Load your site in a new private browsing window
- Navigate to a couple different pages
- Check the real-time tab of your Google Analytics panel. You should see yourself as a live visitor.