
If you’re anything like me, you’re at least a little obsessed with optimizing your WordPress sites to load as fast as possible. And loading CSS asynchronously can improve your page speed and page experience metrics significantly, but there’s a catch.
If not done correctly, you can actually harm user experience and page experience scores due to FOUT (Flash Of Un-styled Text) and CLS (Cumulative Layout Shift).
So in this tutorial, I’ll show you the best (and easiest) way to load CSS asynchronously while providing a high quality page experience to your users.
What is Asynchronous CSS anyway?
Asynchronous CSS Definition
When you load an ordinary web page without any optimization, all the resources (CSS, JavaScript, images) are loaded in the order they appear in the HTML of the page.
This is called synchronous loading, where everything is loaded in order and on-time.
Asynchronous CSS is the process of disconnecting CSS files from the standard loading timeline, and loading them later to prioritize other critical, heavy, or slow resources.
Why load CSS Asynchronously?
The reasons you’d want to async your CSS fall into a few categories. Here are the most common reasons to do it:
- JavaScript files need to load an be processed earlier
- The CSS file(s) are very bulky
- Most of the loaded CSS isn’t actually used on the page (this should be avoided if possible)
Challenges / Problems
The main issue with loading CSS late is that you’ll typically see huge layout shifts and style changes when the CSS loads after the content it’s meant to style.
This is why you never want to async 100% of your CSS for a front-end site. This is the most common issue people run into, and one we’ll tackle head-on in this tutorial.
Instead, we’re going to load the most important CSS code early (usually less than 10% of the whole stylesheet) and then asyc the rest. This results in near-optimal load times without degrading user experience.
Generating Critical CSS
‘Critical CSS’ is an industry term for CSS styles that need to be loaded before everything else. Typically these styles apply to above-the-fold elements like the header, sidebar, hero section, fonts, heading tags and so on.
The exact selectors will vary by site (and even by page). In fact, your site will likely need multiple (possibly hundreds) of different critical CSS files for the various sections of your site.
That’s why you’ll need a quality tool (WP-Rocket in this case) to auto-generate the critical CSS. Attempting to do it manually would be a nightmare (and non-coders).
Steps to load CSS Asynchronously
Let’s quickly cover the basic steps you need to take to set everything up, as well as the tools you can use to do it easily and effectively.
The Steps:
- Generate the ‘critical CSS’ file
- Load the critical CSS inline in the head of your pages
- Load the rest of your stylesheet(s) asynchronously
- Optimize your CSS delivery
- Test
Tools:
We’ll be using WP-Rocket to make the magic happen. In my experience, it’s the easiest and best WordPress plugin to generate critical CSS. And it’s much simpler to use than competing plugins, many of which don’t even include critical CSS generation.
WP-Rocket is an all-in-one caching and optimization plugin, and it’s how I keep this site blazing fast on $12/month hosting.
Are there any free alternatives?
If you’re using Litespeed hosting (less than 20% of the hosting market) you can use LSCache which has freemium critical CSS generation built-in. It’s a great alternative to WP-Rocket if your host is compatible.
Other than that, WP-Rocket is going to be your best bet. Autoptimize does have critical CSS generation, but it’s a paid addon that costs more than $7 per site per month which is more than the cost of WP-Rocket, and actually generates less accurate files in my experience.
Also Read: Autoptimize vs WP-Rocket
Setting it all up
The whole process to get this working in WP-Rocket just takes a minute or two (plus some processing time behind the scenes).
Let’s get started:
1. Enabling Asynchronous CSS
To start using Async CSS, we first need to enable it following these steps (illustrated in the image below).
- Open WP-Rocket settings in your dashboard
- Click on the File Optimization tab [1]
- Check the box marked Optimize CSS Delivery [2]
- Click the button marked Load CSS Asynchronously [3]
- Click Save Changes (important)
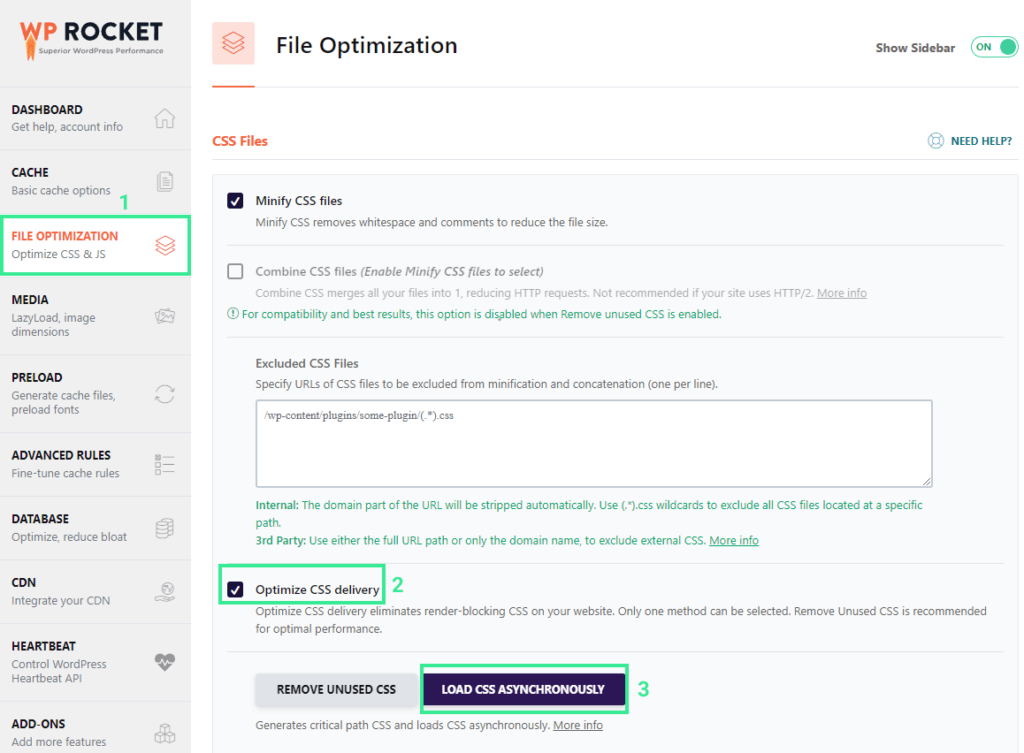
That’s it! WP-Rocket will now start generating critical CSS files for the different areas of your site.
A Note about how Critical CSS is Generated
WP-Rocket doesn’t generate unique critical CSS for every page (at least not automatically). Instead it will fetch the first post of each post type (e.g. page, post, custom post types) and use that to pull generate the CSS.
This works well for many sites, but could be incomplete if you use a page-builder or hooks to change the above-the-fold layout on specific pages.
So if you’re seeing issues with individual pages, you can manually generate critical CSS for that page from the WP editor view of that page.
Just look for the WP-Rocket section in the sidebar under settings > post and click the button labelled Generate Specific CPCSS.
2. Testing your site
It typically takes two page loads to see the benefits of critical CSS if you’ve just activated it, so open your site in a private browsing window and load the page or post you’d like to test.
Is it working?
To see if critical CSS is actually enabled, search for the following element in the DOM:
<style is="rocket-critical-css"></style>
There should be a bunch of inline CSS styles in-between the style tags.
Are there layout shifts?
Visually check the site yourself, and run it through a tool like GTMetrix or Web.dev/measure to see how the Core Web Vitals stats have changed before/after the change.
You’ll especially want to look out for text shifts (late-loading fonts) and big layout shifts (CLS).
GTMetfix is great for fixing CLS because it shows you which exact elements are causing the layout shift.
Conflicts with other Plugins
When using a plugin to generate and load critical CSS, it’s absolutely critical to ensure no other plugin has a hand in optimizing, minifying, or combining your CSS files.
This could cause unexpected issues like:
- incorrect critical CSS generatoin
- non-async loading of non-critical files
- Failure to load certain files.
So if you’re also using a plugin like Autoptimize for other performance-related tasks, make sure to disable all handling of CSS files. Trust me on this one.
Using a CDN
If you’re using a CDN (like Cloudflare), your async CSS should work automatically, though it is a good idea to purge your CDN cache after making the switch, just to ensure that your new CSS and HTML files get pulled and cached properly.
Other than that, there shouldn’t be any changes or tweaks required in your CDN configuration.
Next Steps
Once you’ve tackled CSS optimization, you’ll want to make sure you address two even bigger components of your page load time.
That means optimizing your JavaScript and Image loading.
Fortunately, WP-Rocket can actually handle both of these for you (with the help of compatible image optimization plugins like ShortPixel).
If you want a separate tutorial on these, give me a shout below and I’ll bump it up the (long) list of articles to write.