
Do you want to add Tabs to your WordPress posts and pages?
This tutorial will teach you the best methods to add tabbed content to WordPress. Whether you’re using the Gutenberg Block Editor or the Classic WYSIWYG editor, we’ve got you covered.
And you’ll find CSS snippets for styling, mobile-friendly tweaks, and more.
So if you’re ready, let’s dive in.
Tabs: basics & examples
HTML tabs are kind of like a web-based version of tabbed file folders. You can flip to different content just by grabbing one of the tabs.
Here’s a classic example of tabs:
This is the content from tab #1.
This is the content from tab #2. I can put anything I want in here. Here’s a youtube video:
Tabs are everywhere on the web. Go to almost any SaaS company’s website and you’ll probably see tabs on the homepage or sales page.
Recently the trend has moved towards more modern tab designs where the tab structure is hidden. Here’s a slick example from Cloudways (my favorite WordPress host).
And while these examples look vastly different, the core functionality is the same. The tab controls let you switch between the corresponding tab panels. Each displays different content.
How to add Tabs to WordPress
There are four common ways you can add tabs to your WordPress site. And while each method is different, they have one thing in common:
Every solution requires a plugin.
So no matter which one you choose, you’re going to have to install at least one plugin on your site (if you don’t have it installed already).
The alternative would be writing a Shortcode yourself in PHP and HTML, plus enqueuing a custom JavaScript file to handle the dynamic tab-switching. Is that something you’re interested in? I doubt it.
Methods to add Tabs in WordPress:
| Method | Example Plugins | Works with: |
|---|---|---|
| Shortcode | Shortcodes Ultimate, Simple Tabs Shortcode | Everywhere. Classic Editor, Block Editor, Widgets |
| Gutenberg Block | Kadence Blocks, UAGB, Otter Blocks | Block Editor, Widgets (WP 5.8+) |
| Page Builders | Elementor, Beaver Builder, Divi | Everywhere (with caveats) |
| Standalone Plugin | Tabs by WPShopmart, WP-Tabs | Classic Editor, Gutenberg |
Best Method to Insert Tabs?
There’s no one best answer, but I still have pretty strong feelings on this topic.
My order or preference is:
- Gutenberg Tabs Blocks
- Tabs Shortcodes
- Page Builder Tab Widget
- Tabs Plugin (avoid completely).
Gutenberg Tabs Blocks
If possible, use a Gutenberg block plugin for tabs. This method has several advantages:
- Most user-friendly
- Only Enqueue the exact CSS/JS needed
- Works on posts/pages/widgets
- Styling controls (for many plugins)
So if you’re using the Gutenberg Editor for your posts, you should be using Gutenberg tabs as well. The only exception is if you already have shortcode tabs in use and don’t want another plugin.
Best Gutenberg Tab Plugins:
Shortcode Tabs
The second-best option is to use a tabs Shortcode. It’s not quite as user-friendly as blocks, and you have to carefully place the Shortcodes around your tab panels, but it’s a fine solution.
And if you’re still stuck in the dark ages (classic editor) then it’s sort of your only option.
The best thing about Shortcodes is they work everywhere. So no matter where you want to insert content, even custom post types that doesn’t support blocks, it’s gonna work.
Best Shortcode Tabs Plugins:
- Shortcodes Ultimate (best option)
- Simple Tabs
Page Builder Tabs
Popular page builders like Elementor, Beaver Builder and Divi all have a tabs block. The advantage of using page builder tabs is you get complete visual design control.
But there are several drawbacks:
- Restrictive: In most cases, you’ll have to design the entire post with your page builder, not just the tabs. The exception is if you want to build a one-off template and embed it via shortcode.
- Nested Content: Some page builders (Elementor is one) don’t let you nest widgets inside a tabs block. It’s text and Shortcodes only. This makes it much less useful.
Standalone Tabs Plugins
Standalone tabs plugins don’t let you create tabs inside the post or page you’re editing. Instead, you have create each ‘tabs’ layout as a one-off custom post in the plugin’s tab editor.
I hate this method for several reasons:
- The plugin adds bulk for no reason
- Interrupts your writing workflow
- Slower than creating tabs on the fly
- Extra database queries on page load
Plugins like this were only popular in the pre-Gutenberg days, since they made it easy to visually design a tabs group. But now that WP has fully embraced the block, there’s no real reason to use these plugins. Avoid.
How to add Tabs using Gutenberg Blocks
Here are the basic steps to create tabs in the Gutenberg block editor.
1. Install a tabs block plugin
Install and activate one of these Gutenberg addons:
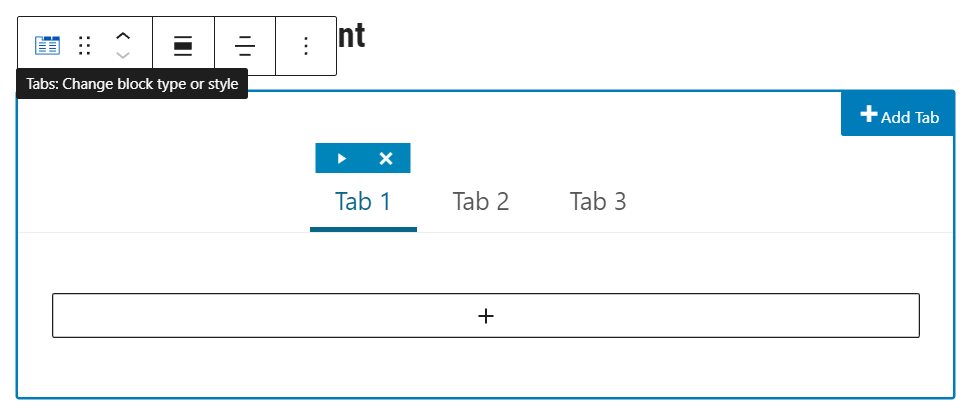
2. Add a new Tabs Block
Click ‘Add Block’ and then select the Tabs block from your block library. For example, here I’ll add one using Kadence Blocks.
3. Add your Tabs content
You can add any available block as a sub-block of the tab panels. You can switch between the panels by clicking the panel tabs in the editor. Then click the ‘+’ icon to add a block inside the tab.
4. Style your tabs
For most tabs blocks, you’ll find the block settings in the right sidebar of the Gutenberg editor. Here you can adjust your tabs colors, borders, fonts, size and overall design.
And best of all, you’ll see the changes reflected real-time in the back end (no reloading the front-end to preview). And several plugins (including Kadence Blocks) let you save default styles as a preset for easy re-use.
Pro Tip: Don’t forget to adjust the layout for different screen sizes (in the responsive settings) to make sure your tabs look just as good on mobile.
How to add Tabs with a Shortcode
Here are the steps to create tabbed content with a tabs shortcode:
1. Get a Tabs Shortcode Plugin
I recommend using Shortcodes Ultimate as it includes built-in styling and excellent support. It’s been under continuous development for over a decade.
2. Add Shortcode tabs to a post
Look for the shortcodes ultimate button in your editor view. In the classic editor, you’ll find it with all the other TinyMCE buttons.

If you’re using the block editor, it’s accessible in either the classic block or the Shortcode block.
Configure your preferred settings, then click insert.
3. Format your Tabs
The tabs shortcode isn’t a single shortcode. It’s actually a bunch of nested shortcodes. You have an outer tab-container shortcode, and inner shortcodes for each individual tab panel.
And when you first insert it, it’ll be a mess:

So the first step is to break the shortcodes apart into logical groups. I typically put each Shortcode tag on its own line.
Like this:
[su_tabs mobile="scroll"]
[su_tab title="First Tab" disabled="no" anchor="" url="" target="blank" class=""]
Tab #1 content
[/su_tab]
[su_tab title="Second Tab" disabled="no" anchor="" url="" target="blank" class=""]
Tab #2 content
[/su_tab]
[/su_tabs]
4. Add your tab content
Once formatted nicely, it’s easy to add titles and content to your tab. Whether you’re using the block editor or classic editor, it should be easy to edit and see how your tabs will be laid out.
The above code will look like this on the front end:
Tab #1 content
Tab #2 content
5. Style your tabs
The final (optional) step is to style your tabs to match your theme. Tabs shortcodes are more difficult to style than block tabs because you usually won’t have visual styling controls.
How to style tabs shortcodes:
- Shortcodes Ultimate Pro: If you upgrade to the paid version (well-worth the one-time cost) you’ll get a number of pre-designed skins that you can apply to your tabs.
- Custom CSS: If you know CSS, you can customize the look of your tabs. For example, you might tweek the text, border & background colors.
Adding Tabs with Page Builders
Elementor, Beaver Builder, Visual Composer, Divi and most other page builders have a tabs widget. Depending on which builder you’re using, the ‘Tabs’ feature may only be available in the pro version of the plugin.
When to use page builder tabs? In my opinion, you should only use page builder tabs when you’re building a page builder page. There’s almost no reason to insert a page builder template into other content types just to create some tabs. The only exception is if you use this template on lots of pages.
Limitations to be aware of:
Some page builders have extremely limited tabs widgets.
Elementor, for example, doesn’t let you nest other widgets inside a tab panel. It’s basically a text-only widget. It severely limits the functionality of the widget.
There’s a hack where you can insert a template shortcode into the tabs widget (which works but is clunky). The other option is to use an Elementor extension that has a nested tabs widget.
How to create tabs with a page builder
Here’s the instructions on how to add tabs for popular WordPress page builders:
Standalone Tabs Plugins
The worst option of all is to use standalone tabs plugins. Now that WordPress has moved to the block editor, there’s really no use-case for these plugins.
I don’t recommend using them for several reasons:
- I disrupts the writing process (have to leave the editor)
- Added weight on your site
- Heavy styles and JavaScript can slow your site
I’m not even going to bother to list options from this category because you shouldn’t be using one anyway. If you can think of a valid use-case, please let me know in the comments.
In the meantime, I recommend you choose one of the better options above. Ideally, a tabs block like Kadence Blocks.
Stackable doesn’t have a Tab block.
Good catch, thank you. I’ve updated the list.