Have you ever hit the back button on a tutorial because it was too long or too hard to find what you’re looking for? If the website had a Table Of Contents you likely would have stuck around longer.
Adding Table of Contents to your WordPress website is great for UX (User Experience) and may even provide an SEO boast through user engagement signals (dwell time, bounce rate).
It’s not wonder that professional marketers and bloggers consider TOCs an essential component to any good blog post.
it’s quite easy to add a table of contents to your own WordPress website. There are several methods available depending on the features you want and which editor you’re currently using.
Methods to add a Table of Contents to WordPress
- Gutenberg Block
- ToC Plugins
- Manually create a ToC with anchor links
- How to add a TOC to your Sidebar
1. Table Of Contents w/ Gutenberg Blocks
If you’re using the Gutenberg editor, a TOC block may be the perfect solution. Technically, this does require installing a plugin, but you may already have a compatible multi-block plugin installed on your site. Furthermore, TOC blocks have different capabilities than standalone TOC plugins.
This method has several advantages:
- Easiest to set up
- Visual styling settings
- Add a TOC to any block-enabled area (such as sidebars)
There are several plugins that include a Table of Contents block. They fall into two categories:
Single TOC Block Plugins:
Multi-block addons that include a TOC:
Regardless of which plugin you choose, the functionality is going to be very similar.
How to add a Table of Contents with Kadence Blocks
Kadence blocks is a completely free multi-block plugin that I use here at BTW. It’s one of the best-coded Gutenberg addons with a good selection of blocks in the free version. There’s a pro upgrade available that adds even more components and cool features like dynamic data.
Steps to add a TOC Block:
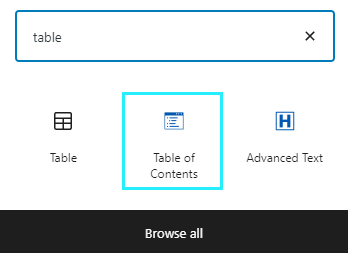
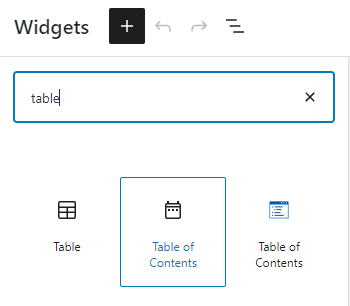
- Click the + icon in your editor to add a new block
- type ‘table’ in the search field to filter the block list
- Select ‘Table of Contents’ to add the block to your post
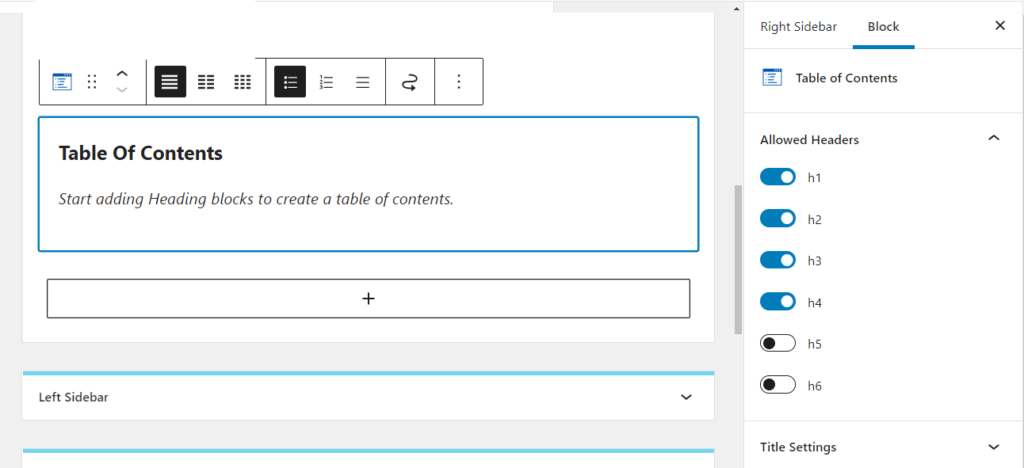
- Choose the heading levels to include (H2, H3, H4 etc.)
- Set the typography, colors & title settings
- Decide if you want to make it collapsible/expandable
- Customize the TOC title in the block itself (optional)
That’s all you have to do. The TOC will be dynamically generated and even adjusts in real-time as you add new headings to your post.
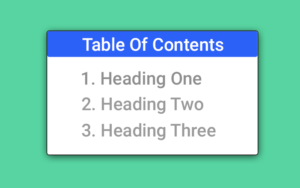
As a demo, here’s an Kadence Table of Contents block for this post:
Why I recommend using Kadence Blocks
The ToC block included in Kadence Blocks is excellent. It offers better customization options than any other free block I’ve found. I also like the visual styling controls (which adjust in real-time in the editor view). You can even change smooth-scroll behavior and hand pick which heading levels to include.
It has pretty much every feature I could ask for, and the CSS and Javascript it loads is incredibly lightweight.
Beyond that, the rest of the addon package is fantastic, and includes some pretty impressive, well designed components. For example, I use their fancy list block frequently on this site to create icon list bullets.
2. Standalone Table of Contents Plugins
There are several Table Of Contents plugins for WordPress, and most of them are completely free. The most popular ones are pretty similar in functionality (partially because they were all forked from one plugin originally.
Advantages of using a standalone plugin:
There are several reasons to choose a TOC plugin over a Gutenberg-based TOC:
Recommended Plugins
There are three standalone plugins that I recommend above the competition, and they’re all completely free.
Best TOC Plugins:
The core functionality of these plugins is very similar.
All include these features:
- Auto-insert TOC (optional)
- Manual insertion via shortcode
- TOC Widget (add TOC to sidebar)
- Edit Hierarchy (which heading levels to include)
- Appearance / Themes, Colors
For my site, I chose Easy Table of Contents because it has one feature the others don’t, the ability to override the text displayed for each heading in the TOC. I find this useful for shortening long headings to keep my TOC compact (especially when displayed in the sidebar).
How to add a TOC with Easy Table of Contents
Here’s how to quickly add a table of contents to your site with Easy Table of Contents.
1. Install & Activate the plugin
Install and activate Easy Table of Contents from the WordPress repository.
2. Configure the TOC settings
You’ll find the plugin settings at Dashboard > Settings > Table of contents
There you can control everything from structure & hierarchy to the visual styling of the table.
Here are the most important settings:
- Enable Support: Which post types allow TOC insertion
- Auto Insert: which post types should auto-insert the TOC
- Position: Where in the post to auto-insert the TOC. The default is before the first heading (not including the h1 post title)
- Show when: Minimum number of headings before the TOC is displayed
- Header Label: The title for the table of contents (e.g. ‘In this article’). You can also hide this completely
- Toggle View: Whether to make the TOC collapsible
- Counter: Whether to use decimals, integers, roman numerals for the TOC list items, or remove the numbering completely.
- Smooth Scroll: Enable to animate the transition when the browser scrolls to the heading
- Smooth Scroll offset: Adjust for fixed elements like sticky navigation
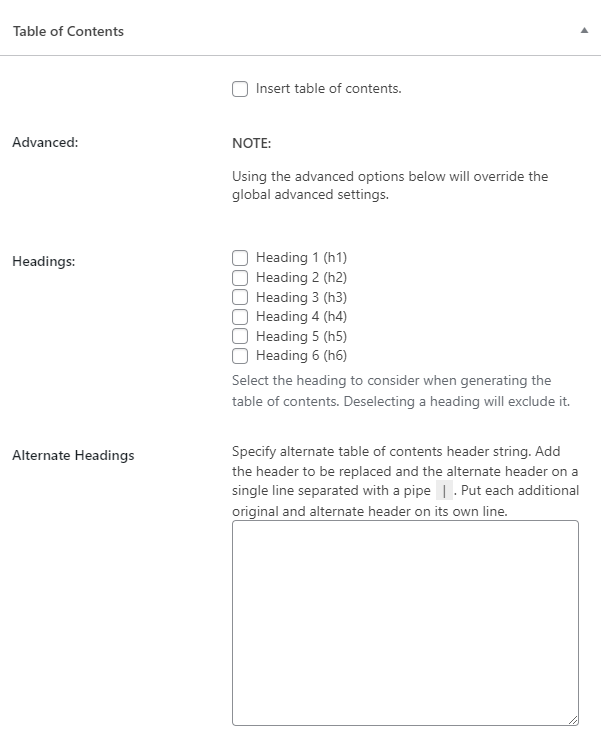
- Headings: Choose which heading levels to include in the TOC. I recommend choosing either H2, or H2 & H3 depending on how your structure your posts. Going deeper (h4+) is probably overkill.
One of the coolest parts is you can override most of these global settings on a per-post basis. For example you can prevent auto-insertion of the TOC, add it manually, change the included heading levels, etc.
3. Insert the TOC
If you’ve chosen auto-insertion, the TOC should automatically be added to all posts types where you’ve enabled auto-insertion (in the plugin settings).
To manually add the TOC, simply use the shortcode anywhere on your site:

4. Add some style
In the plugin settings, you’ll find some basic styling controls. You can either use one of the included color schemes or define your own pallet.
If you’ve got some CSS skills, you can disable the plugins core styles completely and provide your own CSS.
3. Create a Table of Contents Manually (no plugin)
It’s actually quite simple to manually create a TOC for each post. After all, a table of contents is really just an HTML list with anchor links for each list time.
Pros
- No plugin required
- Full control over design and structure
Cons
- Time consuming
- Require double-checking anchors work
- Hard to use in a sidebar widget
Here are the basic steps to get it all set up:
1. Create a list of headings
Use the list element (classic editor) or list block (Gutenberg) to create a list of the headings you want to include. You can indent/outdent them as needed to generate the hierarchy you want.
You can use either an ordered or bulleted list, it’s completely up to you.
2. Add an ID to heading elements
Go through your post and add an ID attribute to every heading you want to link to from the TOC.
How to add an ID in Gutenberg
- Click on the heading you’re targeting
- In the block settings sidebar (right side) scroll down to the section labled Advanced
- Add a unique ID in the section labeled HTML anchor
How to add an ID in the Classic Editor
- Switch the editor view to Text by clicking the tab labelled text
- Find each heading you want to edit
- add an ID attribute in the format
id="id-name" - Save changes to the post before returning to the visual editor view
The HTML should look something like this:
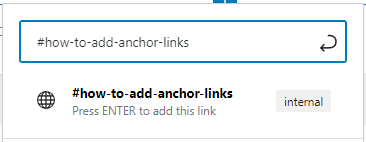
<h2 id="how-to-add-anchor-links">How to add Anchor Links</h2>Code language: HTML, XML (xml)3. Create the Jump Links
Next you need to link the list of headings you created early. We’ll set the corresponding heading as the link target.
You can use the # to create anchor links (or jump links) which navigate within the page.
For the above example, you’d set your link URL like this:
Learn More: How to create anchor links in WordPress
How to: Table of Contents in the Sidebar
My favorite way to use a TOC is as a floating widget in my sidebar. That way, it’s accessible to the user even after they start reading the article. This makes for a great UX and may even boost SEO as well, by reducing bounce rate and increasing dwell time.
For maximum control, you can use my advanced sidebar TOC setup, which gives you full control of which pages the sidebar widget appears on.
Here’s the basics of how to add a table of contents to your sidebar:
- Choose a compatible TOC plugin
- Add a TOC widget to your sidebar
- Configure the widget settings
- Make it sticky (optional)
Compatible Plugins
If you’re running WordPress 5.8 or later, you’ll have plenty of good options. In additional to standalone TOC plugins, you can also use any Gutenberg TOC blocks now that widget areas are block-ready.
Best TOC plugins for Sidebars:
Adding the TOC widget to the sidebar
If you’re using a standalone plugin, it should include a widget which is available under appearance > widgets. If not, you can just insert the TOC via a shortcode inside a simple text widget (or HTML widget).
Configure the widget settings
Your plugin may have widget-specific settings which are editable under appearance > widgets, or from the front-end widgets view in the customizer. If you’re using a block-based widget, settings will be in the right-sidebar.
Make it sticky
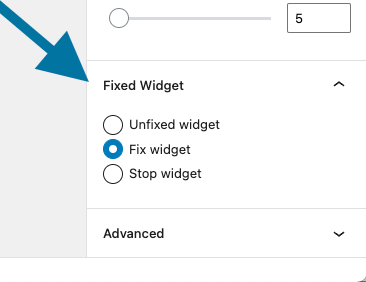
If you want to make a sticky or floating table of contents, it’s easy to do. This setting keeps the widget fixed in the viewport, even as the user scrolls.
All you need is a free plugin called Q2W3 Fixed Widget.
- Install & Activate Q2W3 Fixed Widget
- Go to appearance > widgets
- Select the TOC widget/block
- Go to the widget settings (right sidebar)
- Choose Fix Widget
- Save your changes