
Custom fields are one of the most powerful (yet underused) features in WordPress.
Custom fields allow you to store custom data in the database, access it from anywhere on your site, and build incredible dynamic sites that aren’t possible static HTML and website builders like Wix.
In this guide, I’ll teach you the everything you need to know in order to get started using custom fields in your own WordPress site.
We’ll cover:
- What are custom fields?
- How to add custom fields
- How to display custom field data
- Example uses
So why doesn’t everyone use Custom Fields?
- Custom can be confusing and intimidating for beginners
- There wasn’t an easy way to display custom field data (page builders make this easy)
- Your site is using custom fields, you just don’t realize it yet.
Ready? Let’s dive in.
What are Custom Fields?
Custom fields are a type of data in WordPress, known as Metadata. This custom field metadata can be attached to posts, custom post types and taxonomies.
Custom fields allow you to store pieces if the database that can be searched, displayed, queried, and updated anywhere.
Custom fields example: WooCommerce
Woocommerce is an e-commerce plugin for WordPress that lets you build your own online store. You can add products to your WooCommerce shop and store data about each product, including:
- Brand
- Price
- Size
and so on.
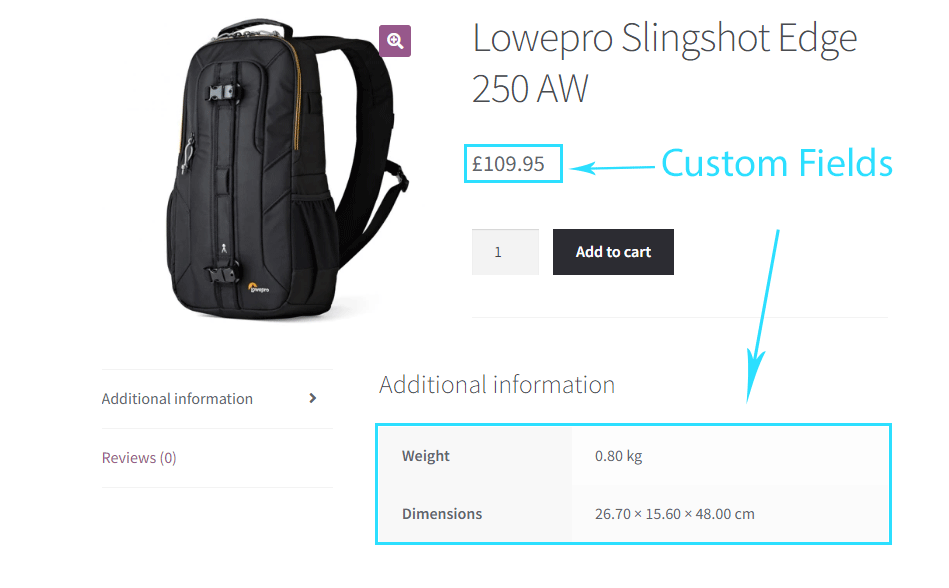
You define the price once via a custom field, then WooCommerce can display it in multiple locations on your site.
Even better, if you change the price, it will be instantly updated everywhere. This is one of the key advantages of using custom fields rather than just a simple text editor to create content.
Why use custom fields?
Custom fields are perfect for any type of data or content that fits any of these criteria:
Use custom fields if:
- Data is used in multiple locations on your site
- Data needs to be updated occasionally
- Data is standardized across multiple posts (listing template, directory site)
What can you build with custom fields?
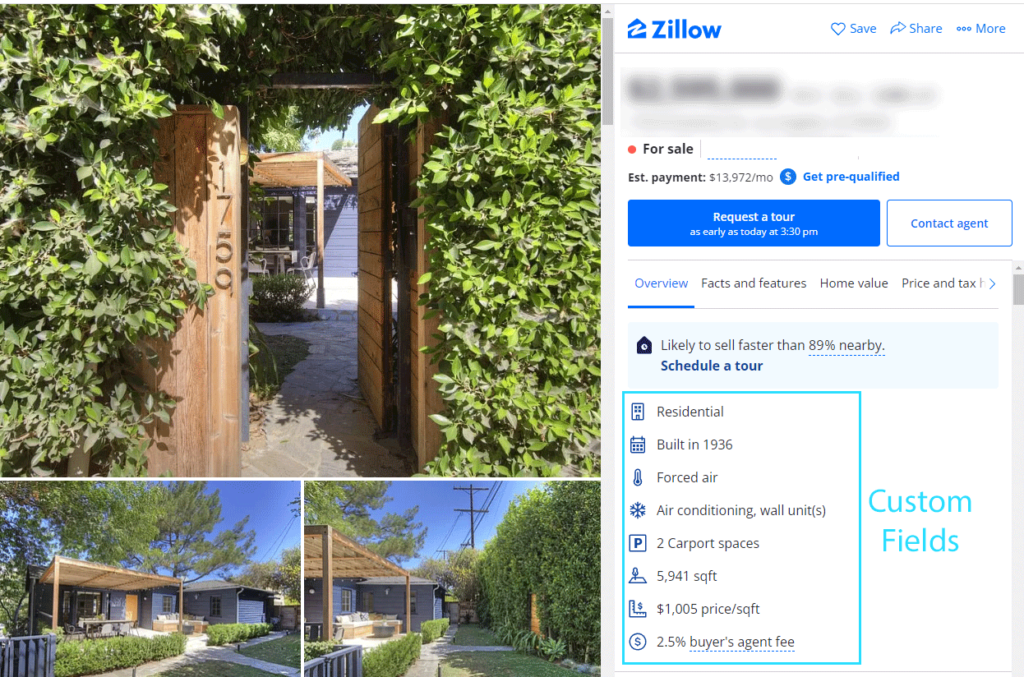
Here are a few quick examples of sites or features that can only be built by using custom fields. They would be nearly impossible to maintain through manual updates.
- Directory site: G2, Capterra, Yelp
- Listing site: AirBnB, Zillow, Realtor.com, Indeed
- Affiliate site: Dynamically update product prices, features, links and logos
- Review Template: display review score, rating details and product attributes
- Dynamic Design: Change the color scheme of your post header on a per-page basis
- Dynamic asset loading: Load a CSS file if a custom field is set (e.g. FontAwesome)
And these are just a few examples. But you can see the power. Once you harness custom fields, you can build amazing, profitable sites incredibly quickly.
For example, sites like pluginforthat just scrape the WP Repository, store that data in custom fields, and display it on the front end. They get longtail search traffic and create zero original content.
Adding Custom Fields
There are several ways to add custom fields to WordPress. While WordPress does natively support simple text-based custom fields, we recommend using a custom fields plugin with an advanced API and more field types.
Methods to add custom fields to WordPress:
- Official: Built into WordPress (text only)
- Custom Fields API (recommended): Multiple field types, easier to display, more powerful. There are plenty of free options like Pods, Carbon Fields and Advanced Custom Fields.
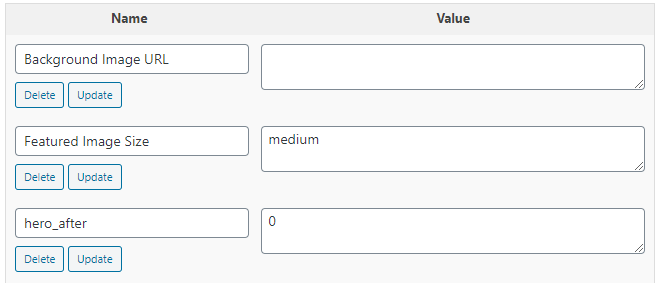
Default WordPress Custom Fields
WordPress ships with built-in custom field functionality. These fields are text-only and consist of only two things:
- Field Key – the name you use to query the field
- Field Value – Text data stored in the field
Here’s what custom meta fields look like on the back end:
Creating a field
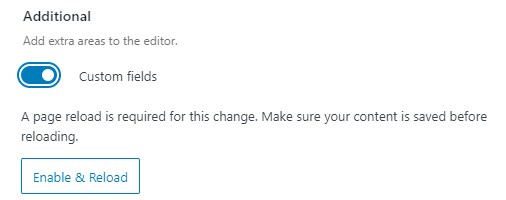
By default, custom fields may be hidden in your WordPress editor. So first, you’ll need to make sure they’re set to display.
To enable custom fields in Gutenberg Editor:
- Click the 3-dots icon in the top right of your editor
- Select Panels
- Check the toggle to show custom fields.
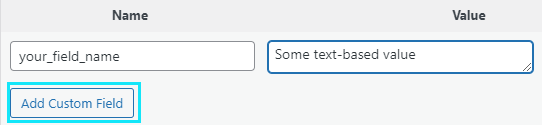
Creating a new custom field
Scroll to the bottom of your editor (below the content) and you’ll see one or more meta boxes. One should be blank. You can add your own custom field name and text-based value, then click ‘Add Field’ to store it in the database.
Why you should use a Custom Fields Plugin instead
WordPress’s native custom fields have a lot of limitations compared to what you get with 3rd-party plugins (even free ones).
Here are just a few of the drawbacks of using built-in custom meta:
- Only supports simple text-based fields
- Must be created on a per-post basis (no bulk field creation)
- No field grouping
- No advanced field types (e.g. gallery, image, color picker, URL, repeater)
- No API for displaying field data (e.g. a shortcode)
3rd-party Plugins
The best way to get started with custom fields is by using a 3rd-party plugin. There are several excellent options, and many of them are completely free.
Why use a plugin to create custom fields:
- More Field Types: Get advanced field types
- Fields Groups & Bulk Creation: Organize fields into groups and connect them to specific posts by post type, category, taxonomy or other custom conditions.
- Display API: Easily display field data without PHP by using Shortcodes, Page Builders, or even Gutenberg Blocks.
Recommended Custom Field Plugins:
These are some of the best plugins for creating custom fields:
- Advanced Custom Fields: Tons of field types, easy field creation and grouping. Includes a shortcode to display field data, but has advanced integration with popular page builders and other plugins.
- Pods: Completely free alternative to ACF. Supports 15+ field types, shortcode-based templating, Gutenberg support, and page builder integration
- Crocoblock/ JetEngine: Complete dynamic data suite that makes it easy to create custom fields, custom post types and custom taxonomies. Integrates with Elementor & Gutenberg.
- Toolset: All-in-one suite for custom fields, custom post types, filtering, and more. Built around Gutenberg and is the most complete Gutenberg-based solution.
Displaying Custom Fields
The whole point of using custom fields is to either display them on the front end, or to query them when listing or filtering posts.
built-in custom fields require writing PHP to access them, but the 3rd-party custom fields plugins give you many different ways to display them on your site.
Page Builders
Page Builder support has been a game-changer for making custom fields accessible to non-developers.
Now you can access custom field data directly from your page builder’s UI, and use this data as content in many of your page builder’s widgets and blocks.
For the most part, this functionality is restricted to paid page builders (or the pro version of freemium plugins like Elementor.
List of page builders that support Custom Fields:
- Elementor Pro: ACF, Pods, Toolset and default custom fields
- Beaver Builder / Themer Pro: ACF, Pods, Toolset
- Oxygen Builder: ACF, Toolset, Pods, Carbon Fields
- Bricks Builder: ACF, Pods, Crocoblock, Meta Box
Pros & Cons of using page builders
All things considered, using a page builder is probably the best way to get started with custom fields, especially if you’re already using one anyway. You can build incredibly complex designs and templates with zero coding skills or design experience.
The only real negative is page builders tend to create larger page sizes than hand-written code, but I still manage fast (around 1-second) load times with Elementor pages.
Gutenberg Blocks
Now that Gutenberg has matured into a full-fledged page builder in its own right, it was only a matter of time before developers built custom field support into their Gutenberg blocks.
There are several ways to display custom fields using Gutenberg
Gutenberg API for Custom Field Plugins (Toolset, Crocoblock)
Some custom fields plugins have built a complete Gutenberg templating system into their plugin.
Toolset
The best example of this is Toolset, which ships with more than 20 block types for displaying custom fields and even building complete page, post, and loop templates.
The entire templating system, which used to be built around shortcodes, was re-built from the ground up to integrate seamlessly with the Gutenberg Editor.
Crocoblock Jet Engine
Another good example of this is JetEngine from the crocoblock suite. It’s not as complete Gutenberg solution as you get from Toolset, but it’s still good enough for building simple templates and displaying JetEngine’s 15+ field types.
3rd-party blocks
Several developers have added custom field and dynamic content functionality into their own Gutenberg blocks. These integrations tend to be simpler, but still work well for basic field types like text, links, colors, etc.
Gutenberg plugins with custom field support:
- Generateblocks
- Stackable (pro)
- Kadence Blocks (pro)
Shortcodes and HTML templating (Pods, ACF)
Several custom fields plugins have their own display and templating system built around HTML and shortcodes.
This allows you to display custom field values, and even create complex loops or templates without writing any PHP. This functionality varies by plugin. Here’s a quick look at some popular options:
Shortcode Templating
Pods has a special shortcode that lets you built templates and display custom fields using what they call ‘magic tags’. You can even use simple loops and if/else logic with just shortcodes.

Learn more: Displaying Pods
Simple Shortcodes
Advanced Custom Fields has a basic shortcode that will retrieve the raw text value of any field. It’s not as useful or flexible as the pods shortcode (above), but it still works for all kinds of simple use cases.
For example, on one of my sites I built a simple widget using just HTML and the ACF shortcode to show the logo, name, and button for the product I was reviewing on the page.
The shortcode looks like this:
[[acf field="field_name" post_id="123"]]Code language: JSON / JSON with Comments (json)PHP
PHP is the old-school method of displaying custom fields, but it is the least beginner-friendly. However, it’s still the preferred method of skilled developers because you get full control over the code and logic when accessing field values.
For example, you can retrieve a field value and then modify (e.g. multiple two fields together) before displaying it on the front-end.
WordPress includes a built-in function get_post_meta() for accessing native custom fields, while 3rd-party custom fields plugins have their own functions for retrieving fields.
Here’s a simple example from Advanced Custom Fields:
// Display the field value 'field_name' (if it exists)
if(get_field('field_name'))
{
	echo '<p>' . get_field('field_name') . '</p>';
}
What’s the best method for displaying custom fields?
Ultimately, the best method for displaying custom field values comes down to two things:
- Your skill level (can you code?)
- Your preferred tools
But when you’re first getting started with custom fields, a page builder like Elementor Pro will probably be your best option.
There are several advantages to using a page builder, especially for beginners. First, you can design visually and quickly. Secondly, you’re not going to break your site my misplacing a semicolon of forgetting to sanitize a field value.
And the fact that you can work so quickly means you can learn quickly, prototype quickly, and get something amazing built in hours rather than days or weeks.
Ways to use Custom Fields in your Site
There are four basic ways to use custom field values in your site:
- Display custom field values in your content
- Display custom values in your template(s)
- Query by custom fields (display posts that have a specific field set)
- Filter by values (filter posts by custom field values)
You can combine these techniques to create nearly any time of modern data-based website.
Below you’ll find examples of data-driven sites you could build using custom fields (in combination with other content types).
Custom Fields Examples in the Wild
To really understand the power of custom field (and what can be built with them) I want to take you through a few examples.
Note: Most of these sites are built with WordPress, using custom fields. However the final example (Airbnb) is an example of something you could build with custom fields.
Rental Cars Listing (Crocoblock)
RentGO is demo site built using the Crocoblock plugin suite. It really showcases the capabilities of dynamic data and custom fields, and makes extensive use of front-end display as well as search & filtering.
Here’s a screenshot of their listing template for a rental car, displaying custom field data like: passenger capacity, color, model, cargo size, fuel economy, transmission, drivetrain and more.
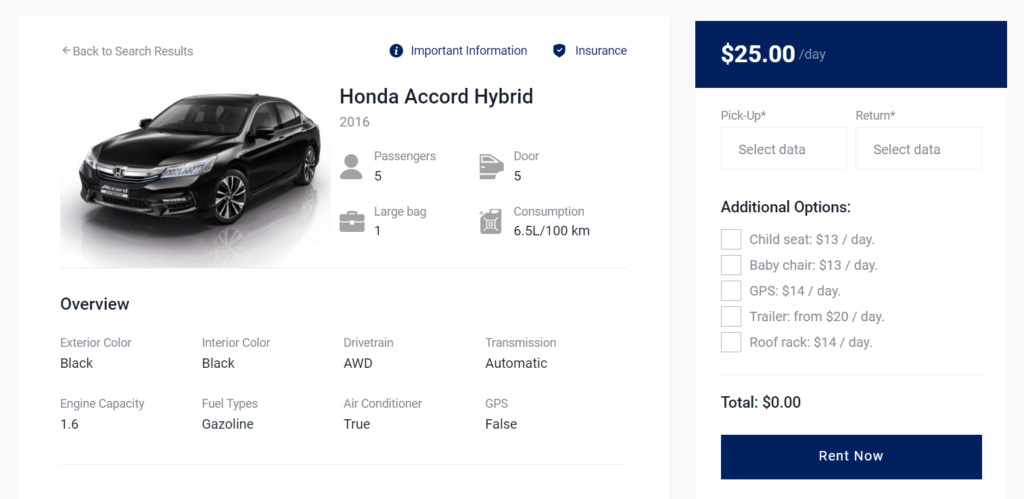
There’s also a listing template, where users can filter cars by custom field data to find the perfect match. Best of all, this was built with zero-code whatsoever, just Elementor Pro and Crocoblock.
Affiliate Site (Cloudwards)
Cloudwards is a high-traffic affiliate site in the privacy and data security niche. They use custom fields to store data about their affiliate partners, including cloud storage providers and VPNs.
They then query this data on the front end to display rankings of affiliate products in their posts.
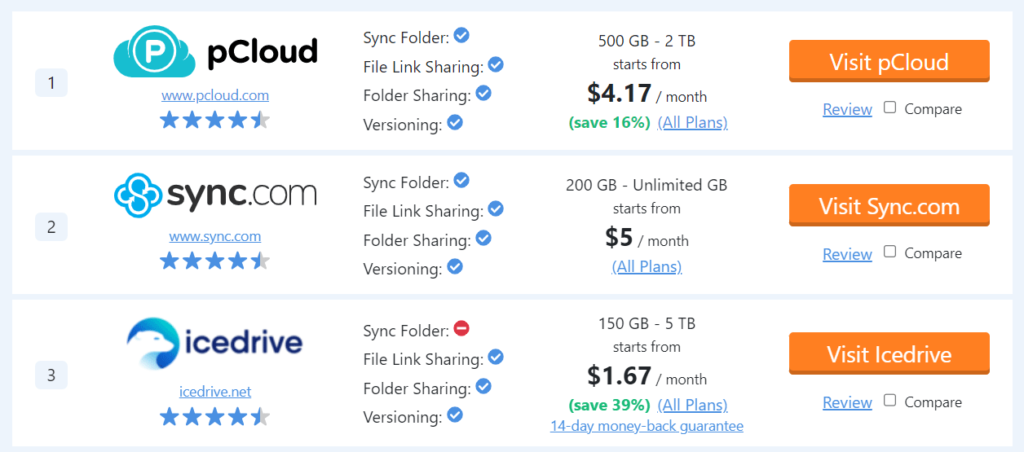
For example, in the screenshot above we can see there are using multiple fields, including: product-logo, product-rating, features, monthly price, refund-policy and affiliate-link.
Cloudwards also uses the data to display in-content pricing data and even built dynamic head-to-head comparison tables. It’s a perfect example of how custom fields can bring in revenue.
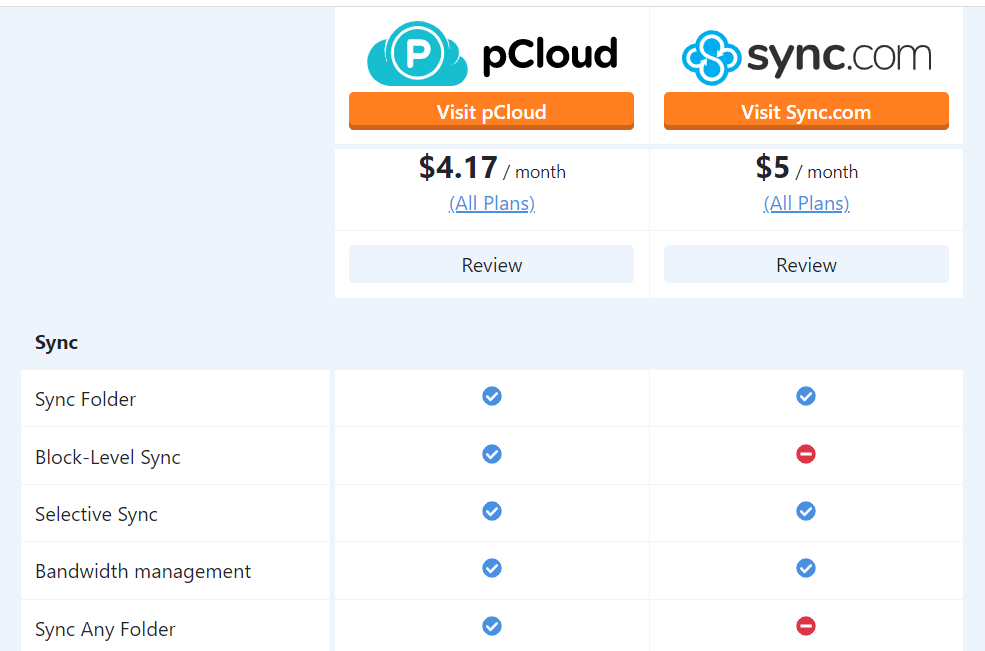
And the best part, once you’ve set up the data and templating, it’s a huge time saver. For example, each comparison article is generated completely via code. It’s not written content.
Custom Theme Options
Custom Fields aren’t just for storing and displaying data. You can also use them entirely on the back-end of your site, for customization purposes.
For example, here are a few ways I use custom fields here at BTW and my other websites:
- Enqueuing Scripts: I’m a bit of a speed junkie, but I don’t like that to get in the way of user experience. So when I need a CSS or Javascript file for specific pages (e.g. FontAwesome) I just use a custom field (toggle or checkbox) to enqueue it for that post.
- Show/Hide Elements: On some review posts, I show a CTA widget in the sidebar. I have a simple script that checks if a custom field is toggled ‘on’. If not, the widget will be hidden.
- Dynamic Colors: Sections of my sites use different colors for the background of each hero section. I can change this with a color-picker custom field on that post, which gets loaded as a CSS variable on the front-end.
- Custom Archive Pages: If I want to override the default archive template (e.g. a category page) I can pull in different content using a ‘post object’ custom field, or add text (or other) custom fields to the existing template.
Next steps & Additional Resources
Now that you understand the basics of custom fields, it’s time to get your hands dirty and start building.
Here’s what you should do next:
- Install a custom fields plugin like ACF (free) on your site or local development server
- Pick a display method (page builders are the best way to start)
- Sketch a basic design for an element or page that could include custom fields
- Create and populate fields to match
- Create a template to display those fields (page builder, Gutenberg, or PHP)
Once you’ve mastered the basics, start brainstorming ideas for real-world uses of custom fields that you can build for your site. Like maybe a custom review widget or affiliate hero section.
Pretty soon, you’ll start seeing opportunities for custom fields and dynamic data everywhere.
Additional Reading
Here are some more resources on custom fields:
Basics:
- Custom Fields 101 (WP Beginner)
- Beginners guide to custom fields (Themeisle)
- Beginners Guide to Advanced Custom Fields
ACF Tutorials:
- Ultimate Guide to ACF (Kinsta)
Official Plugin Documentations
- Advanced Custom Fields (very well documented)
- Pods.io (fragmented, but being rebuilt)
- Carbon Fields (excellent)