

If your theme uses sidebars, you should definitely consider adding a sticky sidebar (or sidebar widget) to your site. And the reason is simple – conversion.
The whole point of having a sidebar is to display useful information to the visitor, separate from the main content of the post.
But what happens when they scroll down past the sidebar content? Valuable screen space is being wasted.
Why make your sidebar stick? A sticky sidebar lets you keep valuable content in front of the user at all times. Whether it’s an opt-in form, recent posts, or a link to a high-converting page, it will stay visible until they’re ready to take action!
TLDR; Create a sticky sidebar fast
- Decide whether you want to stick the entire sidebar or just one widget
- Install a sticky sidebar plugin
- Sticky Widget: Q2W3 Fixed Widget
- Sticky Sidebar: WP Sticky Sidebar
- Choose which element to stick
- Configure additional settings
- Offset from top of the screen
- Screen sizes to stick on
That’s it. It’s really that simple. For full instructions, read on.
Sticky Sidebar Basics
Get the what, where, and why of fixed sidebars.
What the heck is a ‘Sticky’ sidebar?
A sticky sidebar (also known as ‘fixed’ or ‘floating’ sidebar) is a sidebar that never scrolls off the top of the screen. It stays glued in the viewport at a fixed ‘offset’ from the top of the screen.
Why should I use one?
The entire point of a sidebar is to direct your visitors to useful (and profitable) content. But if it scrolls off the top of the screen 25% of the way through your blog post, what good is it really?
By keeping in the sidebar in view, it’ll be waiting for your visitor when they’re looking for the next action on your website. It’s a simple (and highly effective) way to increase pages/visit, dwell time and revenue.
How to make your Sidebar Stick?
For WordPress sites, the easiest answer is almost always a plugin — and there are several excellent (and free) plugins for the job.
It’s also possible to sticky your sidebar with a couple lines of CSS. It works on around 96% of browsers, requires zero JavaScript and won’t break the layout on unsupported browsers.
Fixed Sidebar vs. Fixed Widget
One choice you have to make is whether to stick your entire sidebar, or just stick one widget. Each has its own advantages, but I typically choose to stick individual widgets.
The #1 disadvantage of sticking the whole sidebar is that if the content varies by page, it can often be too tall to display all the content on every device. This results in some sidebar content never being visible to the user (not good).
By sticking individual widgets, you can better control the size of your sticky content and avoid these types of issues. We’ll look at common issues and pitfalls a bit later.
Sticky Sidebar Widgets (recommended method)
For most sites, the best tool for the job is Q2W3 Fixed Widget which lets you make any widget sticky. It works in your sidebar or anywhere else widgets are found.
This is my preferred method for several reasons:
- It’s the easiest (well it was before WP 5.8)
- Can stick multiple widgets
- Single widgets fit better in shorter viewports
Setting everything up is easy breezy. Here’s how:
1. Install Q2W3 Fixed Widget Plugin
Install and activate the plugin directly from your dashboard (or download it from the official repository).
2. Choose what you want to stick
Plan the content of your widget, or choose an existing widget to stick. If you’re looking for ideas, check out our favorite widget plugins, or this video on making great sidebars.
3. Make it Stick
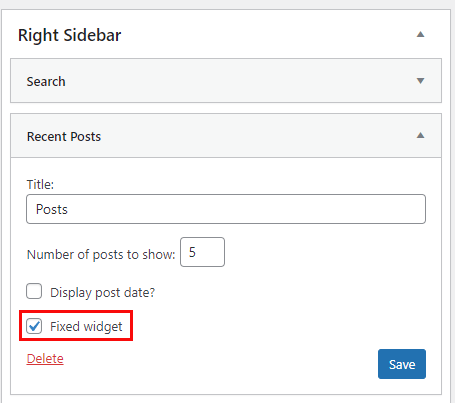
Before WordPress 5.8, all you add to do was tick the ‘fixed widget’ box on the widget settings page and you were done. Unfortunately the new block-based widget editor broke that functionality. The developer is working on a fix, but in the meantime there are two options:
Method #1 – Classic Widgets
- Install and activate the Classic Widgets plugin which is an official WP plugin that restores the old widgets screen.
- Go to Appearance > Widgets and open the widget you want to stick
- Check ‘Fixed widget’
- Test it!
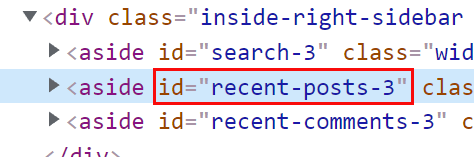
Method #2 – Using the ID
- Find the Widget ID: Find the ID of the widget you want to stick using the ‘inspect element’ technique described here.
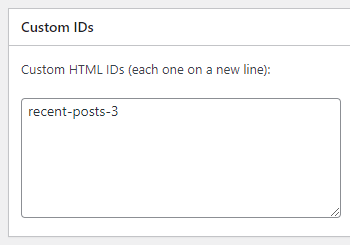
- Go to Fixed Widget Plugin Options: Go to Appearance > Fixed Widget Options
- Add the ID: In the section labelled Custom IDs, enter the ID of your widget (no # sign) as shown below.
4. Test and Troubleshoot
Depending your what theme you’re using, you may need to enable one of the compatibility options in the plugin settings. Also make sure to disable caching while testing because this can sometimes cause issues on production sites.
Z-Index: If your widget content doesn’t cleanly overlap the other sidebar widgets, we’ll need to set a z-index and possibly a background color (skip ahead).
Sticky Sidebar (Plugin Method)
Currently the best free plugin for creating a floating sidebar is WP Sticky Sidebar.
There’s a pro version also, but the free version has all the essential features you need. Here’s what it can do:
- Stick the sidebar (works with any theme)
- Set a vertical offset (margin from the top of the viewport)
- Disable on small screens
- Legacy browser support (works on almost any browser using JavaScript).
Here are the steps to setting everything up:
1. Install the plugin
From the dashboard of your site, go to Plugins > Add New and search the repository for ‘sticky sidebar’.
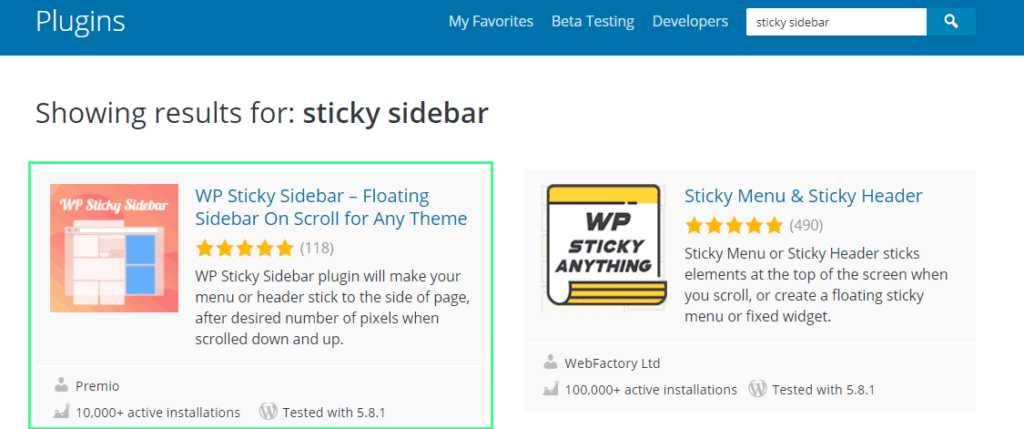
Then install and activate the plugin
2. Find the ID (or class) of your Sidebar
There’s only one setting that’s 100% required. You have to add the CSS selector (ID or Class) of the sidebar that you want to target.
For this, we’ll need to inspect the front-end code of your site to find the correct element to target (or you can check your theme documentation.
Tip: If you’ve never used the ‘inspect element’ feature of your browser before, check out this quick tutorial on Chrome DevTools ‘inspector’
Here’s how to find the ID of your Sidebar:
- Go to the front end of your site (any page that has a sidebar)
- Open Chrome, Firefox or Safari browser
- Right-click the top widget in your sidebar (or just above)
- Choose ‘Inspect’ from the context menu.
- Browse up through the parent elements of the element you inspected until you see one that is the outer wrapper of the sidebar.
- Note the ID of the element
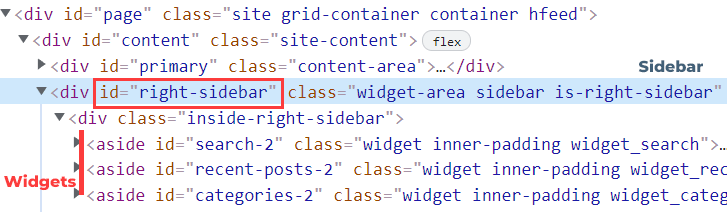
Tips:
- The sidebar container will almost always be a
divorasideelement - The ID of the sidebar is usually
sidebar(orright-sidebar/left-sidebar). - Look for something like
id="sidebar"in the element code.
Then just copy (or remember) the sidebar ID. We’ll use it in the next step.
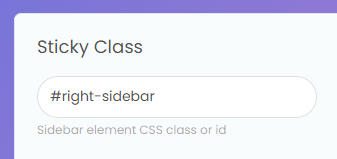
3. Configure WP Sticky Sidebar settings
Now that you’ve got the ID of your Sidebar, it’s simple to configure the rest of the settings.
Sidebar ID or Class
The only required setting is to enter the ID of your sidebar in the field (as shown). If your sidebar doesn’t have an ID (rare) you can use a classname instead.
- For ID’s use # — (#sidebar)
- For Class use . — (.sidebar)
Set the Offsets
You can set a top and bottom offset (margin) for your sidebar. I typically only set a top offset.
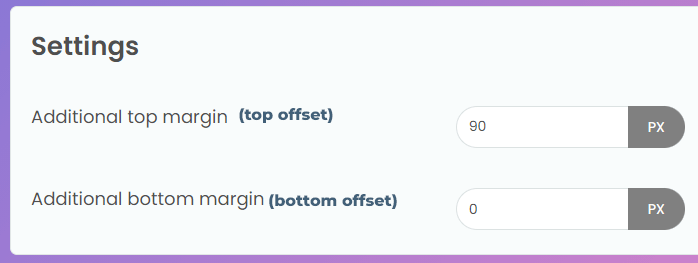
Disable on Small Screens
It’s usually a good idea to un-stick the sidebar when the window is too small to display the sidebar and content side-by-side. Simply enter the width (in pixels) where you want the sidebar to unstick.
In my theme, the sidebar stacks under the content at 768px, so I’ll use that as my setting.

That’s it, you’re done. Just test the sidebar to make sure it works! If it doesn’t, you usually entered the wrong ID name for the sidebar or forgot the # sign.
Sticky Sidebar (or Widget) with Pure CSS
Thanks to the amazing position: sticky property of CSS, we can easily stick almost any element inside its parent container. You can even stick multiple widgets and each will push the previous sticky element up automatically. It’s pretty cool
The only downside of this approach is legacy browser support. The good news, is this won’t break anything on non-compatible browsers, it simply won’t stick. Not a big deal.
Important: Before we start, you’ll need to find the ID of the element you want to stick.
#widget-id {  /* replace with the ID of your element */
    position: sticky;      /* make the magic happen */
    top: 50px;   /* top offset. Adjust as needed for your site. (Required) */
    z-index: 99;     /* Overlap other elements */
}Code language: CSS (css)
So for example, if I wanted to stick my right sidebar which has an ID of right-sidebar I would start my rule #right-sidebar { /* rules go here */ }
If you’re not sticking the last widget in the sidebar, you may also need to add a background color for visual separation from the widgets underneath.
Unstick the Sidebar on Small Screens
You probably don’t want the sidebar to be sticky on mobile devices, and possibly even tablets where the viewport may not be tall enough to display all the content.
We can easily achieve this by wrapping the above CSS in a media query, so it only takes effect when the screen is wider than a set minimum width:
@media screen and (min-width: 768px) {  /* <- this number is your breakpoint */

    #widget-id {  /* replace with the ID of your element */
        position: sticky;      /* make the magic happen */
        top: 50px;   /* top offset. Adjust as needed for your site. (Required) */
        z-index: 99;     /* Overlap other elements */
    }
}Code language: CSS (css)
Where to put the CSS Code? — The easiest option is to stick in the Additional CSS section of the WordPress Customizer. You can also use a separate CSS plugin if you prefer. SimpleCSS is a good (free) option.
Sticky Content Ideas
Once you’ve got the technical part handled, the biggest question is “what should I put in my sticky sidebar?”
And it is an important decision. But think about it like this. What is your visitor going to want next (or what do you want them to do next). Put that front and center.
Here are some ideas:
- Table of Contents: You may notice that I frequently use sticky widgets to display a table of contents on some articles. That’s one great use-case and I wrote a complete guide on how to set it up.
- Opt-in Form: Build your email list faster by keeping a stylish signup form in your sidebar. Don’t have an email list yet? Get started free with Convertkit.
- Featured Posts: Use one of these great sidebar plugins to display related posts (ideally with a thumbnail image). Increasing pageviews/visit is great SEO.
- Featured Offer: Do you have a course or product? What about an affiliate offer that matches the content on your page? Design a nice callout box (or just create an image in photoshop), wrap it in a link, and stick it here.
Level-Up Even More: Use a plugin like content-aware sidebars to show hyper-relevant content in the sidebar. You can display different widgets on every category or even individual pages.
Troubleshooting common issues
The most common issues I see usually arise when sticking individual widgets. Here are the fixes:
Messy Overlap / Widgets visible underneath
This issues pops up when you decide to stick a widget that isn’t the last in your sidebar. If possible you should avoid this, but it’s not always possible when using dynamic widget plugins like Content Aware Sidebars.
The Fix: Add a Z-Index and Background Color
The problem here is that all your widgets have the same z-index, so when they overlap you can see text from both the sticky and non-sticky widgets overlapping. But we can fix this with a bit of CSS.
All you need is the unique #ID of your widget
#your-widget-id {
    z-index: 99;
    background-color: #ffffff   /* add the desired color here (if needed) */
}Code language: CSS (css)
Widget or Sidebar Not Sticking
At least 99% of the time, this is user error (sorry). Doublecheck that you have the correct ID to target and are entering it in the correct format (with the # or without depending on the plugin).
The one exception to this occurs when using the pure CSS method. Some themes (mine included) have a parent container for the widgets that doesn’t stretch the full height of the sidebar. This is fixed with a CSS rule:
.parent-container-class {   /* replace with  class of your parent element */
    height: 100%;
}Code language: CSS (css)