
Shortcodes Ultimate is one of the all-time greatest free WordPress plugins. And the posts shortcode is it’s #1 feature. It’s also the must underrated.
Even in the age of Gutenberg and full-site editing, the posts shortcode still gets regular use on all my sites. And probably will forever.
What you’ll learn: How to harness the full power of the (totally free free) Posts Shortcode, to create amazing post lists and post grids. We’ll start with the basics and then deep-dive into advanced customization.
Why I love the posts shortcode:
Getting Set Up
The first step is to install and activate Shortcodes Ultimate (if you haven’t already).
Note: The free version is all you need, but you should definitely consider going pro if you want to create custom shortcodes.
When you’re ready, create a new page or post (for testing purposes) and we’ll dive into the full capabilities.
Inserting the Posts Shortcode
Shortcodes Ultimate automatically adds a button to editing toolbar of several block types, including the: Shortcode, paragraph and classic blocks. If you’re still using the Classic editor, you’ll find a new Shortcodes Ultimate button in your TinyMCE toolbar.
To insert the posts shortcode:
- Click the ‘Shortcodes Ultimate’ button from the toolbar

- Select posts from the list of shortcodes

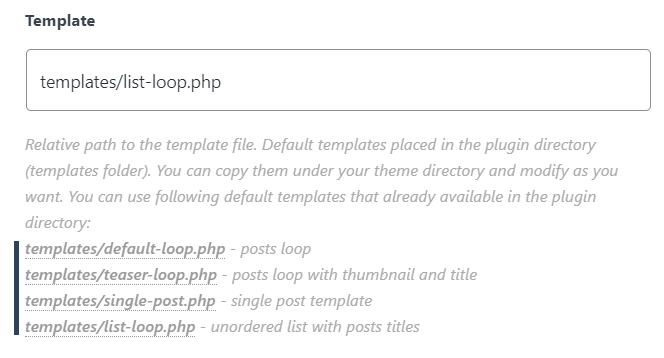
- Select your template (how your posts are displayed)
- Customize the query (which posts are displayed)
Built-in Templates
Shortcodes Ultimate comes with 4 pre-built templates for display your posts:
- Default – Thumbnail, Post Title, Meta, Excerpt, Comments
- Teaser – Thumbnail & Post Title
- Single Post – Thumbnail, Title, Meta, Comments & Full Content
- List – Post Title (text only) as bulleted list
See also: All the templates explained in the official documentation
Selecting a Template
The first step in the shortcode insertion UI is to choose a display template for your posts. You’ll see the four built-in options below the text field. You can simply click on a template-name to select it (you don’t have to type it manually).
Demos
Check out these examples of how the built-in templates look with real content.
How to Load CSS Asynchronously in WordPress
If you’re anything like me, you’re at least a little obsessed with optimizing your WordPress sites to load as fast as possible. And loading CSS asynchronously can improve your page …

The Best Gutenberg Block Plugins (I can’t live without)
The Gutenberg editor has come along way since it was first released in the WordPress core, but the built-in blocks are still quite basic. If you harness the full power …
The Best Alternatives to Advanced Custom Fields (for non-coders)
Advanced Custom Fields (ACF) is a legendary plugin the WordPress community. It has been around nearly as long as WordPress itself, and allows site owners to add dozens of custom …
Note: the appearance of the default loop (all the templates really) is influenced by your theme. For example, the excerpt length is determined by my theme. My theme also tried to insert a ‘read more’ button after each post which I’ve removed via CSS.
Note: I’m not demoing the ‘single-post’ loop because it’s literally an entire post.
Styling: Don’t worry if you don’t love the styles right out of the box. We can easily tweak these with CSS. I’ll get to that in a bit.
Query Builder
The query controls which posts are display in your loop, how many posts are displayed, and how they’re sorted. And you get tons of options.
You can combine these options for incredibly specific and customize queries.
Let’s look at the options in greater detail:
Post IDs
Choose specific posts to display. Enter a comma-separated list of Post-IDs (how to find it?)
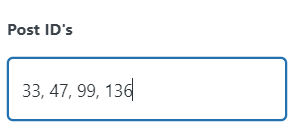
Note: Every content type has a post-id so you can still use custom post types or pages here.
Posts per page
How many posts to show in the loop. Set it to -1 to show all posts.
Post Types
Choose which Post Types to display. This includes pages and custom post types.
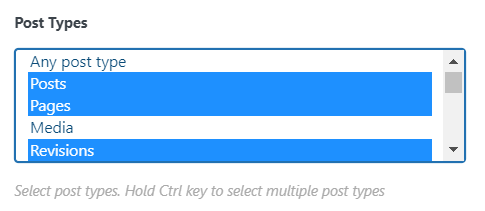
You can select multiple post types. Ctrl + Click to add additional.
Taxonomy
Choose a taxonomy to filter by. By default this is set to Category but you can select from any other taxonomy (like Tags). You can also use custom taxonomies.
Once you select a taxonomy type, you can choose which terms to include from that taxonomy, as well as a match type.
- Taxonomy: Tags, Categories, or Custom
- Terms: Which terms to include from that taxonomy (e.g. specific categories)
- Match Type: Do the posts have to match all, any, or none of the selected terms
Additional Query Arguments
You get several additional parameters you can use to fine-tune your query:
- Authors: Author ID’s to include
- Meta Key: Posts with a custom field that matches a specific meta key
- Offset: Remove the first x number of posts from the result
- Order/Orderby: You can order the loop results by any number of parameters, including title, ID, date, or even custom field values.
- Post Status: Show only posts that match a specific status (e.g. Published).
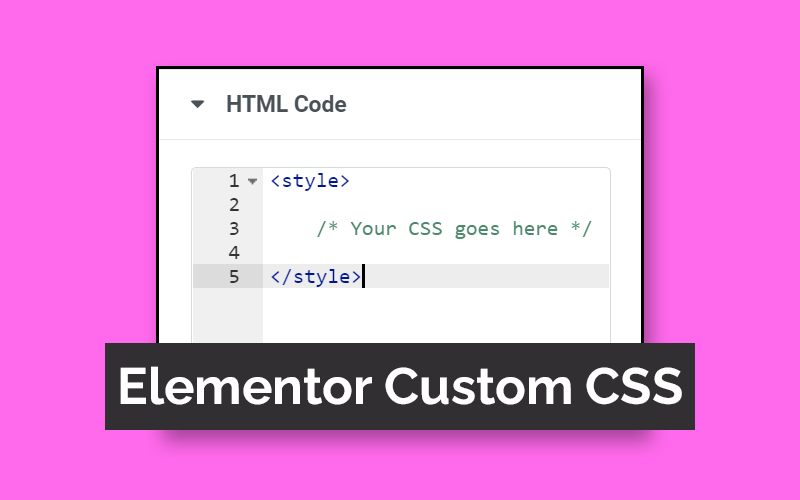
Styling the Loop Templates w/ CSS
The pre-built templates are good enough, but pretty basic. And one thing you don’t get with this Shortcode is useful styling controls. But it’s nothing a bit of CSS can’t fix.
Note: Unfortunately, this is one of the only SU shortcodes where you can’t (yet) add a custom class to the markup. So all your CSS changes will be take effect site-wide. Currently the only way around this is with custom templates (or you could use a simple div wrapper for styling purposes).
What tweaks to make?
There are a number of modifications we can make via CSS. Here are a few ideas:
- Image Size: Make the featured image larger
- Image Alignment: Make the image full-width at the top of the card.
- Layout: Make this into a 2 or 3 columns responsive grid, rather than a single column.
- Card design: Format the posts like a ‘card’ template with CSS.
- Container Styles: Add a border or background color to the loop container
CSS Examples (and demo)
Below you’ll find 3 different variations of the default-loop, each styled with just CSS. Just click the buttons to switch variants. The CSS used to create each variant is available also (except for the default version).
How to Load CSS Asynchronously in WordPress
If you’re anything like me, you’re at least a little obsessed with optimizing your WordPress sites to load as fast as possible. And loading CSS asynchronously can improve your page …
The Best Gutenberg Block Plugins (I can’t live without)
The Gutenberg editor has come along way since it was first released in the WordPress core, but the built-in blocks are still quite basic. If you harness the full power …
The CSS for this layout
.su-posts-default-loop .su-post {
    border: 1px solid #ddd;
    padding: .7em;
}

.su-posts-default-loop .su-post-comments-link {
    display: none
}

.su-posts-default-loop .su-post .su-post-thumbnail {
    width: 200px;
    height: auto;
}

.su-posts-default-loop .su-post-thumbnail > img.wp-post-image {
    max-width: 200px;
    max-height: 200px;
}

.su-posts-default-loop .su-post-excerpt {
    font-size: 15px;
}

.su-posts-default-loop .su-post-meta {
    margin-bottom: 0 !Important;
}

@media screen and (max-width: 720px) {

.su-posts-default-loop .su-post .su-post-thumbnail {
    float: none !important;
    width: 100%;
    }
.su-posts-default-loop .su-post-thumbnail > img.wp-post-image {
    max-width: 100%;
    max-height: unset;
    }
}Code language: CSS (css)
.su-posts-default-loop {
display: flex;
flex-wrap: wrap;
background-color: #f0f0f0;
padding: .5em;
}
.su-posts-default-loop .su-post {
border: 1px solid #cacaca;
box-shadow: 0 0 7px -2px rgb(0,0,0,.5);
padding: 1em;
flex-basis: 33%;
margin: .7em;
border-radius: 5px;
overflow: hidden;
min-width: 180px;
flex-grow: 1;
background-color: white;
}
.su-posts-default-loop .su-post .su-post-thumbnail {
float: none;
width: calc(100% + 2em);
height: auto;
margin: -1em -1em .5em -1em;
}
.su-posts-default-loop .su-post-thumbnail > img.wp-post-image {
max-width: 100%;
max-height: unset;
}
.su-posts-default-loop .su-post-excerpt {
display: none;
}Code language: CSS (css)Custom Templates
The real power of the Posts Shortcode is unleashed when you start creating custom templates. That way, you get 100% control over the html that is rendered on the page. This lets you customize both the content and layout that gets displayed.
Note: Custom templates require at least basic PHP and CSS knowledge. They should be tested on a development server before using on a live site.
When to use custom templates
Here are a few reasons to create a custom loop template:
- To display additional content (like custom fields)
- Styling (re-arrange HTML for better styling and structure)
You can also use custom loops to display content before (or after) the post loop, such as a ‘related posts’ headline, or an opt-in form.
Custom Template Location
By default, Shortcodes Ultimate looks for custom templates here:
/wp-content/themes/your-theme/su-posts-templates/
So you should create a subfolder of your current them called /su-posts-templates/ and then you can create a new custom template file.
Create a custom Template
Create a new php with whatever filename you want. I’ll use my-custom-loop.php
Now you can add the PHP loop that the shortcode will use to generate the HTML on the front-end.
For example, lets say I wanted to create a custom loop to display a custom field from Advanced Custom Fields called review_rating. It might look like this.
<?php if ( $posts->have_posts() ) : ?>
  <div class="su-posts my-custom-loop">
    <?php while ( $posts->have_posts() ) : ?> // check for posts
      <?php $posts->the_post(); ?> // display each post in the loop
      <a href="<?php the_permalink(); ?>">
        <div class="post-image">
          <?php the_post_thumbnail( 'medium_large' ); ?>
        </div>
      </a>
      <a href="<?php the_permalink(); ?>"><?php the_title(); ?></a>
      <div class="review-rating-wrap">
      	<span class="review-rating"><?php the_field('review_rating'); ?></span>
      </div>

    <?php endwhile; ?>
  </div>
<?php else : ?>
  <p>Posts not found!</p>
<?php endif; ?>
Now save your new template in the /su-posts-templates/ folder of your theme.
Next up, write the custom CSS that will style your template on the front end.
Inserting Custom Templates
When inserting the su_posts shortcode, you can specify a template right in the insertion dialogue.
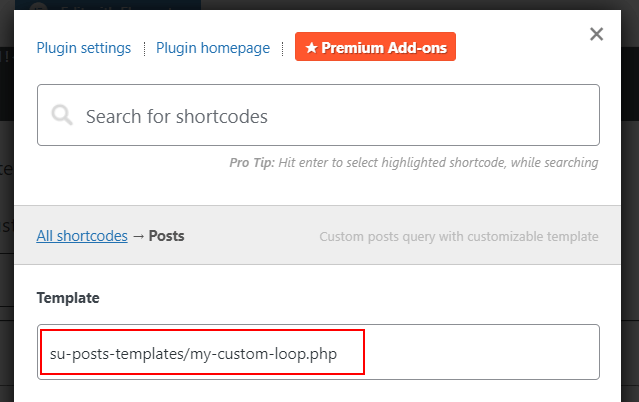
Make sure to include the path to the folder your loop templates are in (relative to your theme).
You can also add the template directly to the shortcode. Like this:
[su_posts template="su-posts-templates/my-custom-loop.php"]
Learn more: Make sure to checkout the official Posts Documentation from Shortcodes Ultimate.