

Using custom fields with Gutenberg can be challenging if you’re not sure how to get started. Fortunately, there are several easy methods to create a display custom fields using only Gutenberg blocks.
Once you discover the power of WordPress custom fields, you unlock almost unlimited possibilities in what you can build. But the hardest part of using custom fields is how to actually display custom fields on your website.
Just a few years ago, you had to be a PHP developer to leverage custom fields and build fully dynamic websites. Then page builders like Elementor Pro and Beaver Builder added support for custom fields and suddenly anyone could build dynamic, data-based websites.
But what about those of us that primarily use Gutenberg, the official WordPress editor? How can we display custom fields inside Gutenberg blocks without resorting to PHP code or a bulky page builder?
I’ve got you. Let’s dive in.
Enabling Custom Field Support
There are multiple custom field plugins available for WordPress, including:
These plugins add a custom API, intuitive UI and extra field types, and I highly recommend using one of them.
But you don’t actually need a plugin to start using custom fields. They’re built into WordPress already, but they may not be visible in the Gutenberg editor by default.
Enabling WordPress Custom Fields in Gutenberg
Here’s how to enable custom fields in the Gutenberg editor
Note: If you’re using one of the custom field plugins mentioned above, you can skip this step.
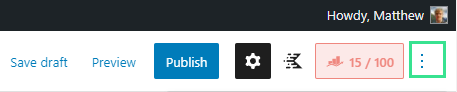
- Click the options icon in the top right corner (three dots)
- Choose preferences (all the way at the bottom)
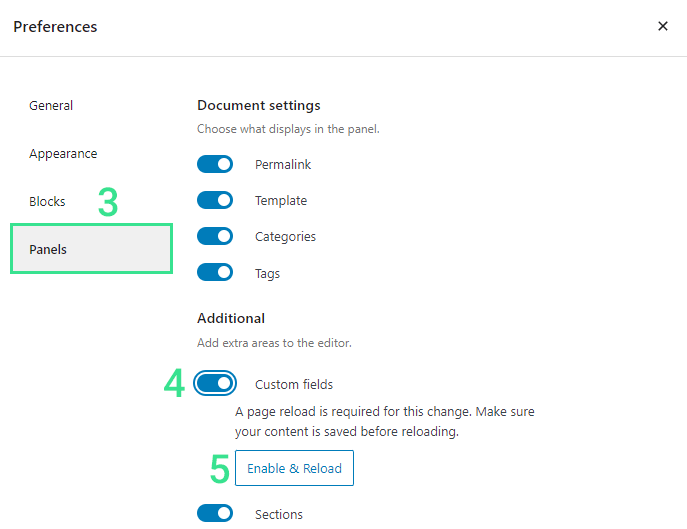
- Click the Panels tab
- Enable custom field support under Additional > Custom Fields
- Click Enable & Reload
Creating a new custom field
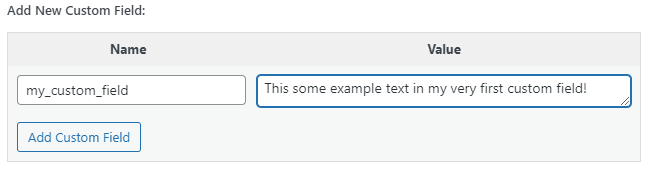
After the page reloads, you should now see a new section for custom fields below the main content area of the block editor. Here you can create new custom fields attached to the page or post.
- Give the custom field a unique name (use underscores for spaces)
- Add text or HTML as the field value
- Click Add Custom Field to save it to your database
Methods to Display Custom Fields in Gutenberg
Once you’ve got custom fields saved to your database, you’re going to want to display them on the front end. That’s the entire point of custom fields.
There are tons of uses for this. For example, I use custom fields to store vendor images, prices, and affiliate links for plugins & tools that I feature here on the website.
There are three main methods to display custom fields on the front end.
- Block plugin included in your custom field suite
- 3rd-party block plugins that support dynamic data
- Shortcode (for compatible plugins like ACF & Pods)
Custom Field Blocks
Many of the 3rd-party custom field solutions include their own functionality for displaying field values on the front end. The advantage of this method is that it works seamlessly with your custom field plugin and may add advanced functionality.
Which plugins have a built-in Gutenberg Block?
- Toolset (paid plugin)
- Advanced Custom Fields (Pro-only feature)
- Pods.io (free, beta)
- JetEngine (paid plugin)
If you have one of these plugins, it’s usually best to use the built-in functionality for displaying custom fields.
3rd-party Gutenberg Blocks with Dynamic Data
Currently there are a few Gutenberg addons that allow you to pull dynamic data such as custom fields directly into your Gutenberg layouts. They work with most custom fields plugins and built-in WordPress custom fields (limited functionality).
Gutenberg Addons with Custom Fields support (dynamic data)
Custom field shortcodes
Pods.io and Advanced Custom Fields (free & pro) have a built-in shortcode for displaying custom field values. You can add this shortcode to any Gutenberg block to display the value on the front end (only useful for basic text and HTML fields).
How to use custom fields with Kadence Blocks
The Pro version of Kadence Blocks adds impressive functionality, including full custom field support. Once you purchase and enable it, you’ll find a dynamic content button added to most new Kadence blocks.
For example, on this button block you can see there is a dynamic content option for both the button text and the link.
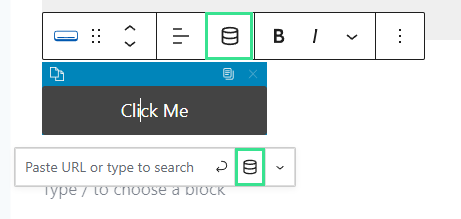
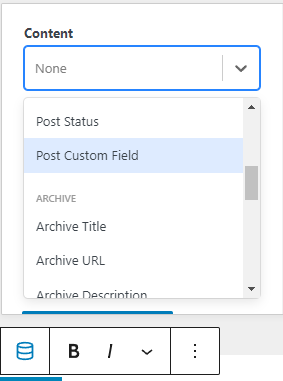
And when you click the Dynamic Content button, you can choose Post Custom Field as your data source. They choose which meta key (field name) you want to use.
Supported field types
Don’t worry, you’re not limited to simple text-based fields like headings and URLs. You can even pull images from custom fields. Even better, the developer is working to support the Gallery Field in ACF pro (coming soon!).
Field Types: Text, WYSIWYG, Image, URL
Design Examples
Kadence blocks Pro is so powerful, Toolset’s team used it for some tutorials, even though Toolset already includes in own front-end block for displaying fields.
Here’s an example layout they built:
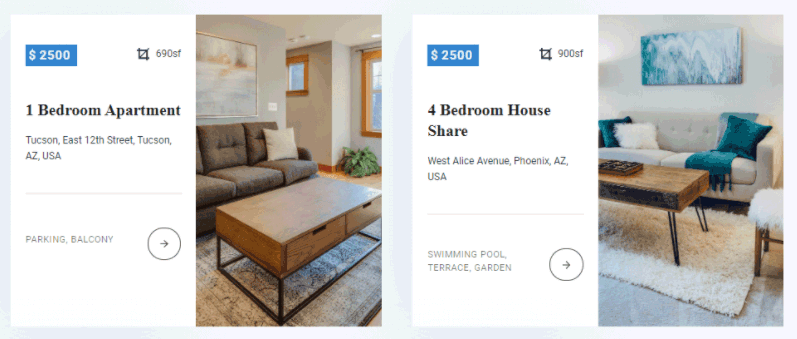
Gorgeous isn’t it? See the full tutorial for more design examples and how they built it.
How to display custom fields with Stackable
Stackable Premium is high quality Gutenberg addon (and competitor to Kadence blocks). The premium version includes more than 30 block types, dozens of pre-built layouts, and custom fields integration.
Stackable’s dynamic content feature supports:
- Advanced Custom Fields (ACF)
- Toolset
- Stackable’s own dynamic fields (included in Premium).
- Meta Fields (basic text-based WordPress custom fields)
Displaying Fields
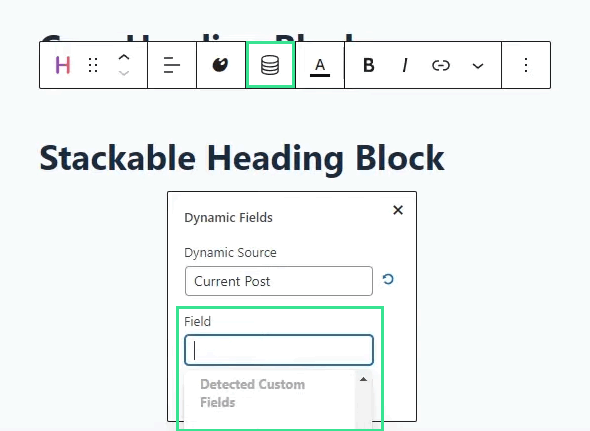
Adding a custom field to your Stackable block is almost identical to Kadence Blocks. Simply click the ‘Dynamic Content’ button in the editor and choose a custom field to pull the data from.
Here’s David McCan with a closer look at how it all works:
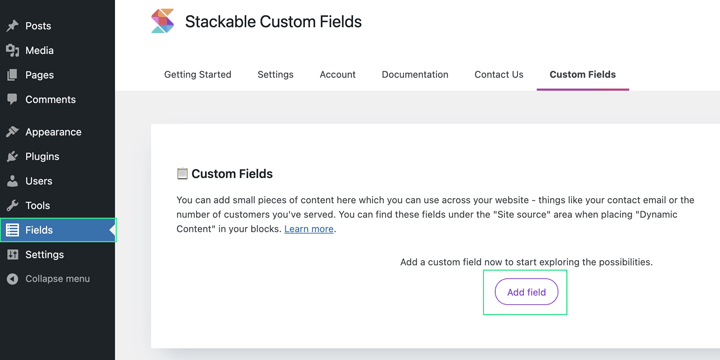
Stackable Dynamic Fields
Stackable Premium includes its own version of custom fields. Unlike other solutions, there fields aren’t tied to a specific post or custom post type. Instead, they’re more like global fields data that you commonly re-use on your website.
Displaying field values with a Shortcode
If you’re using Pods or Advanced Custom Fields (free & pro), the plugin includes a shortcode that lets you easily output the value of any custom field in your database.
The shortcode is limited to text-based output, but it can still be used to display things like images and URLs if you have a bit of HTML knowledge.
ACF Shortcode
The ACF shortcode takes the following format:
[acf field="field_name" post_id="123"]Code language: JSON / JSON with Comments (json)- Field: The name of the ACF field you want
- PostID (optional): numerical ID of the post, page, or custom post type
If you don’t specify an ID, the shortcode will use the ID of the current post.
Pods Shortcode
The Pods shortcode is even more advanced than ACF’s (ironic?). Not only can it display field values, it can also display entire shortcode-based templates, depending on the parameters you specify.
But for displaying field values, the format is almost identical to ACF:
[pods id="1" field="post_title"]
[pods slug="the-post-slug" field="post_title"]Code language: JSON / JSON with Comments (json)- id (optional): ID of the target post (defaults to current post)
- slug(optional): Slug of the target post (defaults to current post)
- Field: Name (meta key) of the field you want to display
Example Usage
Here’s an example of how to use the shortcode. Lets say you’re writing a product review and you have a custom field named product_price. Now you can display that price multiple times in the post, but you can easily update it from a single location (the custom field).
Then just insert the shortcode into a paragraph block, list block, heading, or any other text-based block like this:

Summary & Additional resources
As you now know, there are several good methods to display custom fields inside Gutenberg blocks. Unfortunately, most of the best options are paid products, but I think excellent free solutions will be available in the future.
Every day, more users (and developers) are embracing the power of Gutenberg, and its capabilities as a full page editor (and theme builder). As more users delve into the power of custom fields, there will be products and plugins designed to match their needs.
Recommended Plugins for dynamic data:
And if you find Gutenberg’s custom field support is still to limited, check out Elementor Pro. It has deep custom fields integration, and can be extended with Crocoblock to add advanced field types, ajax filtering and more.
Matthew, what happens when you want to use a shortcode inside a block that includes its own query loop? For example, I’m working with a 3rd-party block that allows me to display content for all the rows of a CPT. If I use [acf field="..."] within a block in that loop, it won’t work because the default $post_id represents the post/page that I’m working on, not the CPT loop item. Is there an easy way to accommodate that use case?
I think you could write a wrapper shortcode for the [acf] shortcode. That wrapper function would access the ID of the primary post (main loop). Then it would pass that id to the ACF Shortcode, using the post_id parameter. It’s a bit hacky as a solution though, and definitely outside the standard use-case for the shortcode method. I’d usually try to build my own block using something like Lazyblocks if the layout you’re going for isn’t too complex. Zero PHP needed.