I have a problem. The top WordPress table of contents plugins are great for generating a table of contents at the top of your post. But they lack flexibility if you only want the TOC in as a sidebar widget. And then only on specific posts.
But I don’t necessarily want (or need) the TOC on every post, I prefer to use it for super-long posts and in-depth guides.
And yes, I realize TOC plugins let you selectively disable/enable the TOC on specific pages, but it doesn’t play nice with the sidebar widget.
Here are my requirements (what I’m building):
- The ability to display the TOC in the sidebar only.
- Display the sidebar TOC widget on specific pages
- Ability to change the text for TOC list items
- Attractive styling (with a little CSS)
- Free!
Choosing a Table of Contents Plugin
There are 3 TOC plugins in the WordPress repository that are way more popular than the others. And they’re nearly identical in features with subtle but important differences.
Why so similar? They are all forks of the same original plugin.
The Contenders:
- Table of Contents Plus (the O.G.)
- LuckyWP Table of Contents (the slick new clone)
- Easy Table of Contents (the most flexible)
After testing, I tossed LuckyWP from consideration because it lacks key features available in one or the other of the two contenders and doesn’t bring anything new.
Solution #1 – The easy method
Choose this method if:
- You don’t want to mess with custom taxonomies or multiple sidebars
- You don’t need to a customize the heading text of your TOC
Tools Used:
How it works
TOC+ is the only plugin of the three that gives you an option to only display the TOC as a widget, and prevent it from being auto-inserted in the content as well.
The Steps:
- Customize your settings (which headings to include, post types etc)
- Add the TOC+ widget to your sidebar
- Enable ‘Show the table of contents only in the Sidebar’ widget option
- Disable (or Enable) on posts using the shortcodes.
1. Choose your settings
Here are the settings you should check & configure under Settings > TOC+ > Main Options.
As an example, these are the options I chose:
- Show when x number of headings are present – 4
- Allow user to toggle visibility – no
- Show Hierarchy – Yes
- Number List Items – No
- Enable Smooth Scroll – Yes
- Heading levels to show (advanced options) – H2 only
2. Add the sidebar widget
TOC+ automatically installs a widget when you activate the plugin.
Go to: Appearance > Widgets
And look for the Widget called TOC+
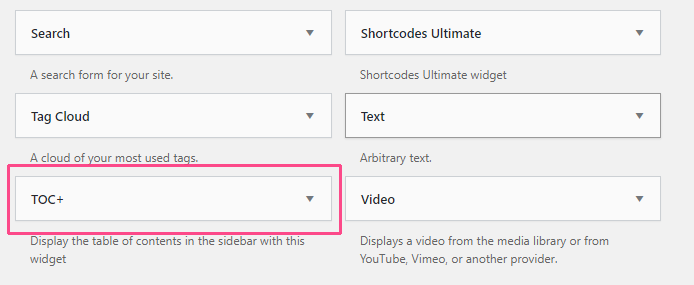
Drag it to the sidebar where you want it to display, and select the post types you want it to show on.
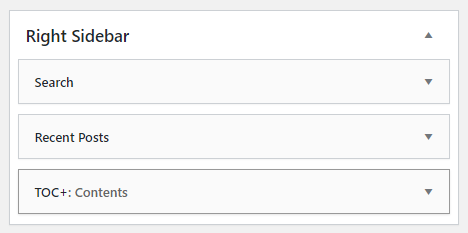
3. Enable ‘show only in sidebar’
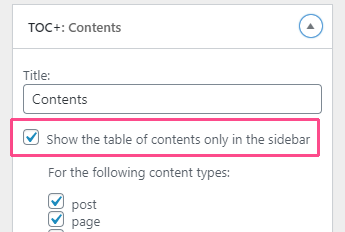
In the widget options, choose the post types where you want to display it (I chose ‘posts’ and ‘pages’).
Then check/enable the option ‘show the table of contents only in the sidebar‘
4. Enable/Disable via shortcode
The TOC+ plugin doesn’t have a checkbox toggle to enable/disable the auto-insertion on specific pages. Instead you can use the built-in shortcodes.
Which you use will depend whether you’ve enabled ‘auto-insert’ for the current post type.
To Enable the table of contents in a post…
Add the shortcode [TOC] anywhere in your post.
To Disable the table of contents…
Add the shortcode [NO_TOC] anywhere in the post
Solution #2 – Conditional widget logic
This method works with most any ‘table of contents’ plugin, and instead relies on conditional sidebar/widget logic to determine whether it should display on a given post or page.
Tools Used:
- Easy Table of Contents (free)
- Content Aware Sidebars (free version)
Choose this method if:
- You want complete control over when and where the TOC displays
- You want to use a plugin other than TOC+
- You don’t mind installing 1-2 additional plugins
How it works
Instead of relying on our Table of Contents plugin for display logic, we’re going to build our own using Content Aware Sidebars, which lets you conditionally display a sidebar or widget when certain conditions are met.
We’ll then tag our posts using a custom taxonomy (or you can just use standard tags if you want).
1. Choose & Configure your TOC plugin
For my own site, I chose Easy Table Of Contents because it offers maximum flexibility and features.
Reasons I chose Easy TOC:
- Custom heading labels for TOC widget
- Edit TOC settings on a per-post bases
- Javascript-toggled ‘Active’ Class allows better styling and UI
- Built-in ‘sticky’ functionality
But you should know: The settings can be a little tricky, and there’s a bit of a trial-and-error process to get everything working as you want.
How I configured Easy Table of Contents
It’s really critical to get the settings right so that:
- The table of contents gets inserted when you expect
- It doesn’t create a table of contents in the main content (optional)
These are the key settings I chose:
- Enable Support: Posts, Pages. You should enable TOC support on every post type that you would potentially want to display it.
- Auto-Insert: None. I didn’t select any post types (to prevent the TOC being inserted into the main content area).
- Show when ‘X’ headings are present: This determines whether or not the TOC will display in your sidebar, and it only contents headings of the levels you select to include. If you want to manually enable the TOC widget on a post-by-post basis you should set this to a low number.
- Show as hierarchy: Do you want to indent subheadings to show hierarchy? I chose yes.
- Heading levels to include: In the sidebar, you probably don’t want to include every single heading level from H1-H6. My default settings are H2 & H3 only. On longer posts I will manually override to be only H2.
2. Create a new ‘Content-Aware’ Sidebar
First, you must install & activate content aware sidebars if you haven’t already.
Create a new sidebar.
The easiest way to do this is:
- to go to Appearance > Widgets
- Click ‘Add New Sidebar’ (above your existing sidebars)
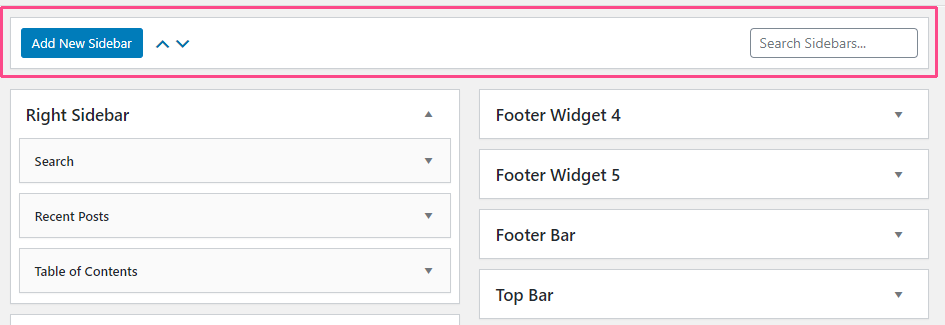
You should also add a descriptive name. I simply called mine: Table of Contents.
3. Set the Display Action
Do you want to completely replace your existing sidebar with the table of contents?
Or would you rather merge them together. Typically I merge them, but if you want only the TOC (for distraction-free reading) then choose ‘Replace’.
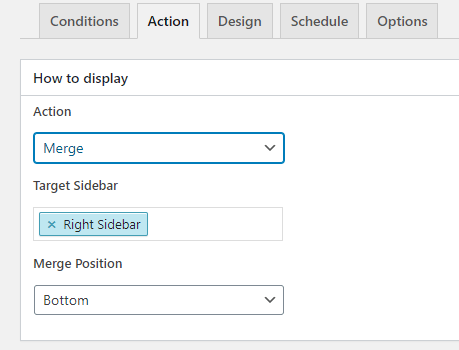
You then need to choose the ‘Target’ sidebar which will be replaced (or merged). I’m using my Right Sidebar in this example.
Merge Position: In general, you would want to merge at the bottom of your sidebar, especially if you’ll be making it a ‘fixed’ or ‘sticky’ widget.
4. Set the Display Conditions
We need to choose when and where the sidebar will automatically display, as well as whether it should replace or merge-with your existing sidebar.
You have a lot of flexibility in how to set this up, and it’s really a personal choice based on:
- What posts or post-types you want the widget on
- What percentage of posts will use it
- Do you want auto-display or do you want to manually enable it per-post.
Basic Setup (enable manually per-post)
If you want maximum control, or you only need the widget on a few super-long posts, manual setup should work great.
Instead of adding display settings (we won’t add any) you’ll just choose your ‘Table of Contents’ sidebar in the settings of each post where you want to enable it.
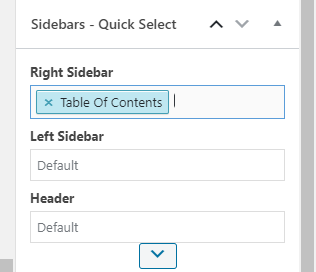
To find the settings:
- Open a post
- Click the ‘Settings’ (Gear Icon) and go to the Post Settings tab
- Scroll to the bottom and look for the Sidebars section
Advanced display settings w/ taxonomies
Another option is to set the sidebar to display when certain conditions are met, including when the post has a specific taxonomy. You could use built-in tags but the more seo-friendly option would be to create a custom taxonomy, visible only on the back-end.
You can do this quickly and easily with a plugin free plugin like Pods Framework.
Using pods I created a custom taxonomy called ‘Post Labels’, made it hierarchical (like Categories) and created a new post label called ‘Table of Contents’
Advanced Taxonomy Settings to configure in Pods:
- Hierarchical: True (optional).
- Public: True (required to appear as a display condition)
- Rest API: Enable (required to enable support for Gutenberg posts)
- Associated Post Types: Posts, Pages + any custom post types you want
Then I set my display conditions like this:
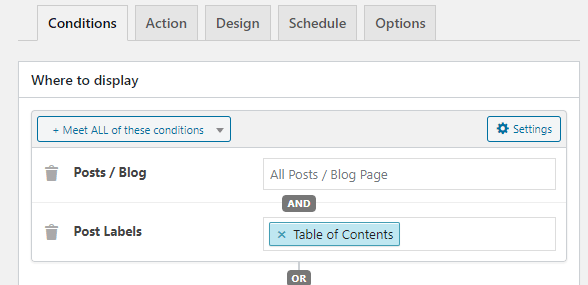
And Voila! The sidebar will now be inserted on any page where I’ve selected the ‘Table Of Contents’ post label.
Customizing the Widget
I took two extra steps to improve the styling and usability of the TOC widget:
- Make it a ‘fixed’ (sticky) widget so it’s always visible.
- Custom CSS for a unique look (that matches the theme)
Make it a fixed (sticky) widget
In my opinion, it’s a best practice to make your TOC widget ‘sticky’ in the sidebar, so that is always visible and doesn’t go off the top of the page as the visitor scrolls.
The easiest way to do this is with a free plugin like Q2W3 Fixed Widget or WP Sticky Sidebar (stick your entire sidebar).
You can also do it without a plugin, using a bit of css. The exact classes to target will depend on your theme:
You need to find the class name for your specific sidebar, and replace that in the CSS code.
/*

This CSS code works for GeneratePress. You need to replace the <em>class</em> name of the sidebar with the class from your own theme

*/

.inside-right-sidebar {
    height: 100%;    /* Make sidebar the full-height */
}

aside.ez-toc {
    position: sticky;
    position: -webkit-sticky; /* Safari */
    top: 50px; /* Offset from top of container */

}Code language: CSS (css)
Customizing your Table of Contents with CSS
For a more custom look and better theme integration, you can add some custom CSS to the widget.
Here are some things you could try:
/* Make h2 headings larger and bold for clarity */

.ez-toc .counter-hierarchy .ez-toc-heading-level-2 > a {

 font-weight: bold;
    font-size: 18px;
}

/* Add a background color to the TOC */

.ez-toc-list {

    background-color: #f7f7f7;

}Code language: CSS (css)
Wrap-up
Ok, this should be a great starting point for you to create your own customized table of contents with conditional display logic.
Things to remember:
- Table of Contents Plus (TOC+) is the only plugin with a ‘show in sidebar’ option
- You can use ‘Content Aware Sidebars’ to add display logic to any TOC widget
- You should make it a ‘sticky’ widget for a better user experience (always visible)
Did you find this useful? Did I forget anything? Or do you need help troubleshooting an issue?
Let me know in the comments!

