

Everyone likes to keep the number of stylesheets and external scripts to a minimum, especially ones that are only needed on a few pages.
But there’s an easy way to load custom CSS and .js files only on specific pages. I want to share the method I’ve chosen, as well as a few good alternatives.
Benefits of conditionally loading CSS & JS as-needed:
- Faster load times and Page Speed scores
- Easier to optimize for the Core Web Vitals update
- Fewer plugins on your site
- Less CDN bandwidth usage
- It’s easier than you think!
Why load external resources conditionally?
From time to time, you may need to load an external resource on a specific page (or a few pages). It could be a JavaScript library like DataTables, or a CSS file like FontAwesome.
Or perhaps you’re running A/B tests on Google Optimize, but you don’t want to load the code on every page of your site.
After all, each additional script or stylesheet is one more HTTP call that could cause:
- Slower load times
- Worse page-speed scores
- Cumulative Layout Shift (CLS)
- Render-blocking
And it seems silly to load a script on every page of your site if you only actually need it on a handful. Right?
That’s why I prefer to load these files only where I need them. It’s a technique that has helped me achieve sub 1-second load time while still delivering engaging, interactive content to my readers.
So first, let’s look at some of the widely-available solutions to this problem.
Common Solutions
The two methods I see used most often are:
- Custom header/footer scripts plugin (per-page)
- Optimization plugins like PerfMatters
Here’s a closer look at each, as well as the reasons I wanted a better solution.
Custom Header/Footer Scripts
There are several plugins that offer very similar functionality for loading scripts on a per-page basis. Two of the most popular are: Header and Footer Scripts and Insert Headers/Footers.
And how it works is pretty simple. The plugins let you add external scripts in two locations:
- Site-wide (everwhere)
- Per-post
And the per-post method works fine. Under each post in the editor, you’ll find two meta boxes where you can paste links to external CSS or JS files and load them in either the header or footer.
Advantages:
- Fine-grained control (load scripts exactly where needed)
- It’s free
Disadvantages:
- No central location to manage the per-post scripts
- Have to update scripts on each page indiviually
- No conditional targeting (e.g. by category)
PerfMatters (and other optimization plugins)
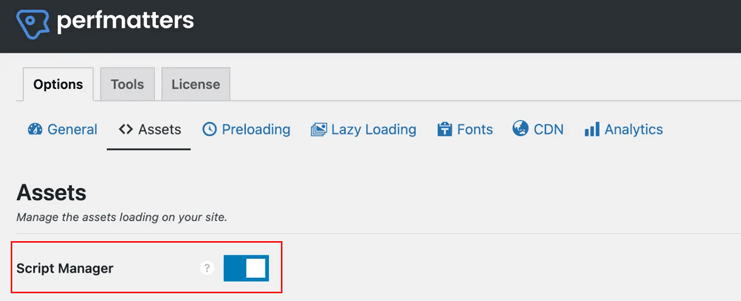
PerfMatters is a well-respected WordPress Optimization plugin. It’s in a competitive category against standouts like WP-Rocket and free options such as Autoptimize.
But PerfMatters sets itself apart with a script-management module that lets you selectively disable scripts and stylesheets where they aren’t needed.
This make it possible to take a bloated website with far too many external resources, and still achieve respectable load times.
Advantages:
- Works with already-bloated sites
- You can don’t have to be stingy with plugins and scripts
- Page-level targeting
- Some conditional-targeting
Disadvantages:
- It’s subtractive (starts sitewide, and remove as-needed)
- Conditional targeting is limited
- Expensive (paid plugin)
My main complaint about Perfmatters script management is that it’s purely subtractive. That is, you can disable scripts that are already loaded, but you can’t conditionally add scripts only on some pages.
And the targeting leaves something to be desired. You can use regex rules, but it’s not intuitive and definitely not as user-friendly as something like the conditional-hook capability of GeneratePress Pro.
Better Solution: Custom Taxonomy + Conditional Hooks
Don’t be intimidated by the terminology, it’s not that complicated (I promise).
Taxonomy: A label for classification or organization. Categories and Tags are two built-in taxonomies in WordPress.
Conditional Hooks: Almost everything in WordPress is loaded via hooks. All your plugins use hooks to load styles, scripts, and generate content. A conditional hook is just a hook with custom conditions.
Explain it like I’m five? If the post category is ‘news’, load mystylesheet.css
That’s a conditional hook. And while hooks are written using PHP, we’re going to set this up without touching a line of code.
My Solution, Explained
My solution has two essential components:
- Use conditionals to load scripts only when the condition is met
- Label posts with a custom taxonomy to use as the condition
So here’s the exact process I followed to set it up:
Conditional post labels (in a nutshell)
- Create a new taxonomy called ‘Post Labels’
- Create new ‘Post Labels’ for each script, widget, or resource I want to load
- Write a hook to load that resource for every post that has that Post Label.
Still confused? Here’s a real-world example from my own site.
Example: conditionally-load FontAwesome
- Step 1: Label my post(s) with the ‘Font Awesome’ post label
- Step 2: Create a hook to load Fontawesome whenever a post has the ‘Font Awesome’ label.
Then, I used the wonderful Hooks Element from GeneratePress Pro to create my conditional with zero PHP code. Don’t worry, I’ll show you how to set this up without GeneratePress in a minute.
Here’s the simple code snippet I added to the wp_head hook:
I mean is that easy or what?
And now Fontawesome loads exactly where I want it to, only on the pages that actually need it. Like this tutorial on icon list bullets.
So if you’re ready to try this on your own site, let me show you how to set everything up…
How to set up your Conditional Hooks
To get this working on your site you need two things:
- Taxonomy – (to label posts)
- Hooks – a way to create your conditional hooks. For most people, this will be a plugin (or theme addon). Or you can just use PHP if you’ve got some dev skills.
Taxonomy Setup: Overview
You’ve got two options. You can either use a built-in taxonomy (tags would work best), or you can create a custom taxonomy.
I chose the custom route because I like to display tags inside my post content, and I don’t want non-content tags to show or get indexed by google.
How to easily create a custom taxonomy? Use a plugin of course. These are the best free options:
- Custom Post Types UI (free) – This is my pick because it’s lightweight, well-supported, and will actually generate the PHP code for you if you want to remove the plugin later.
- Pods (free) – Pods is an all-in-one suite that includes custom post types, custom taxonomies and custom fields. It’s like Advanced Custom Fields on steroids (but with awful documentation).
- Toolset (paid) – Toolset is what Pods would be if it were a paid plugin. The core features are pretty similar, but Toolset has a much larger budget and team so the documentation is excellent and it’s incredibly powerful. It’s also overkill for just custom taxonomies.
Advanced Tip: If you’re comfortable working with FTP and editing PHP files, you can use a tool like GenerateWP to generate your taxonomy code.
Next, I’ll show you how to create your custom taxonomy, but first let’s look at the hooks.
Hooks Setup: Overview
Next we’ll setup our conditional hooks that will use the wp_head hook to enqueue our JS or CSS files.
Currently, there’s no good 3rd-party plugin to write hooks for you. I’m tempted to hire someone to build this, but in the meantime you have two options:
- Use your theme’s hook builder (if available)
- GeneratePress Premium
- Astra Pro
- Ocean WP
- And others
- Write the hook with PHP
Don’t worry, I’ll guide you through both options.
Step 1: Create a custom taxonomy
Regardless of the method you use to create your taxonomy, you’ll have several options about how the taxonomy behaves. These are the important settings you should take note of:
- Public: True (required to use taxonomy as in a hook)
- Show Admin UI: True
- Post Types: The post types where you want to use your taxonomy (e.g. posts/pages)
Register your custom taxonomy
So here’s how I set it up using Pods:
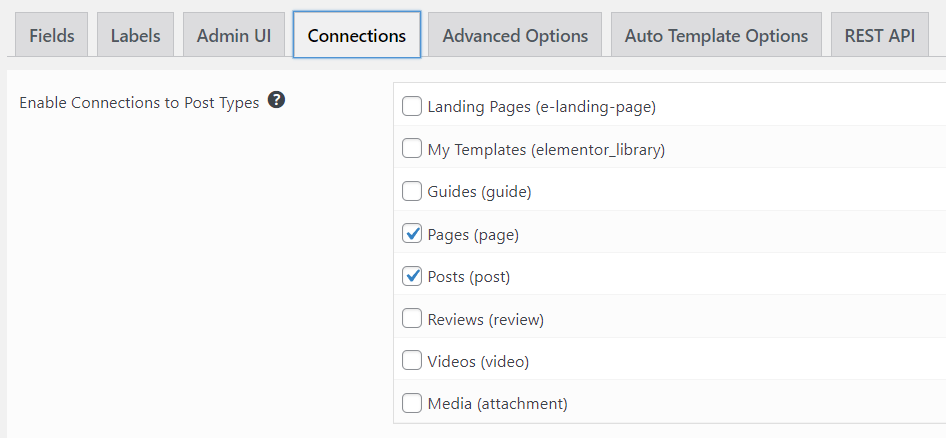
- Create a new taxonomy and give it a name. You’ll need a singular and plural label. I called mine Post Label
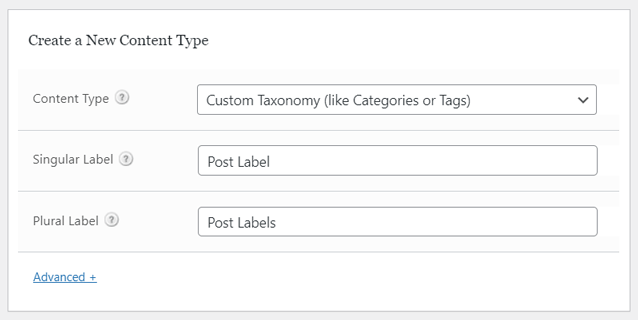
- Choose the post types you want to associate with your taxonomy. For now I just went with posts/pages but you can always add more later.
- Configure the advanced options. They should look like this:
- Public: True
- Hierarchical: True
The rest of the options are up to your discretion. I prefer to set them to hierarchical (like categories) so that you get a checkbox-style list of post labels to choose from when applying them to a post.
- Save your options to create the taxonomy
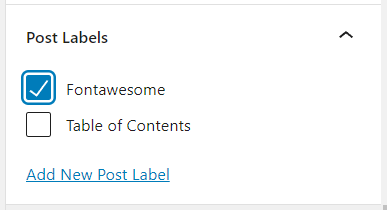
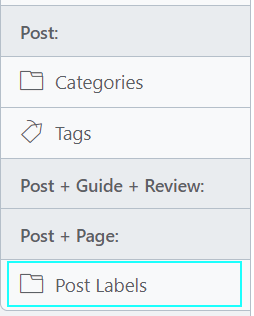
Add taxonomy items
Now that you’ve created the Post Label taxonomy, you can actually create new Post Labels, just like categories. To try it out, go to the editor view of any post type associated with your taxonomy.
On my site, it was just above the featured image section of the post settings sidebar.
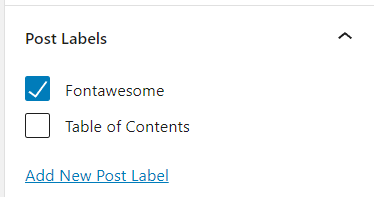
To create a new item of your taxonomy, just click the Add New button and name it whatever you like.
Tip: If you don’t see your custom taxonomy in the sidebar, go to the screen-options in the top-right and make sure it’s set to display.
Step 2: Create your conditional hooks
Now that you’ve created your taxonomy and at least one item or entry for that taxonomy, we can set up a hook to do something when you apply that taxonomy to a post.
My preferred way to do this is with the Hooks Element bundled with GeneratePress Premium.
It makes it so incredibly easy to set these up. But you can also do it with PHP. Let’s walk through each option:
Using a Theme’s Hooks Module (GeneratePress)
There are dozens of hookbased themes out there, and many of them bundle similar functionality in their pro version. Compatible themes include GeneratePress, Astra, OceanWP, Neve, and others.
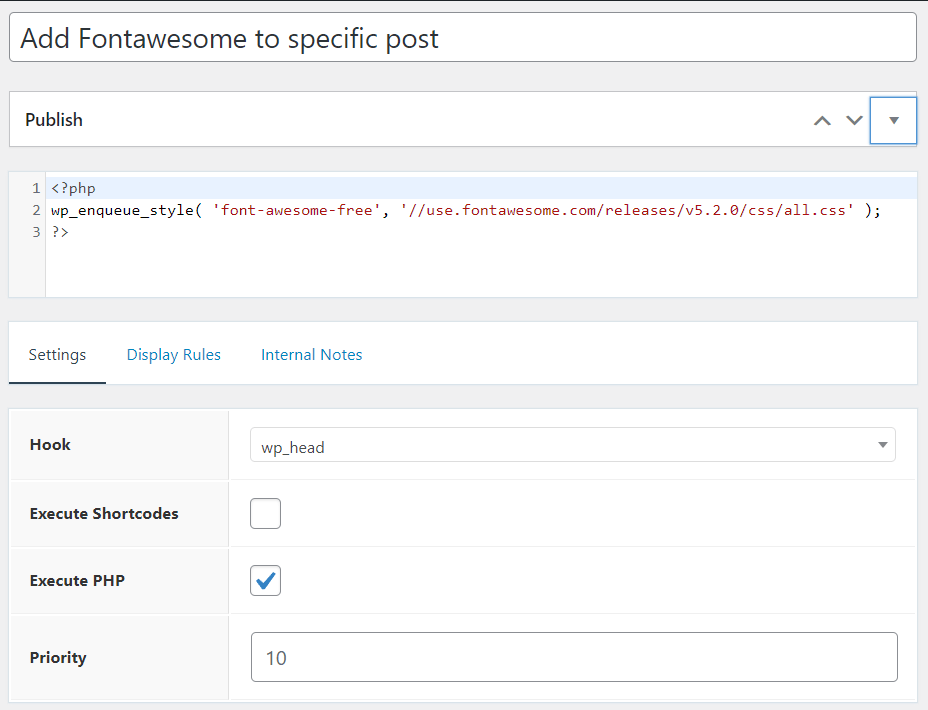
1. Create a new hook element
In GeneratePress I go to Appearance > Elements > Add new element

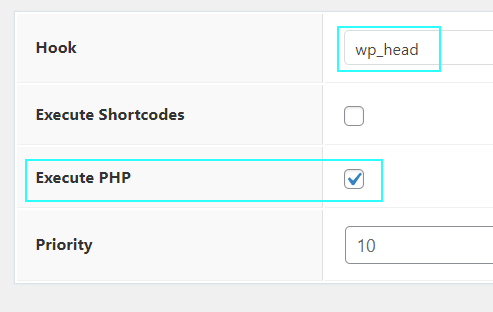
2. Edit the hook
- Name: Give your hook a name
- Content: Edit the content you want to insert into the hook. In this case I’m using the WordPress function
wp_enqueue_styleto load a custom CSS file. Make sure to include<?php ?>tags if writing php.
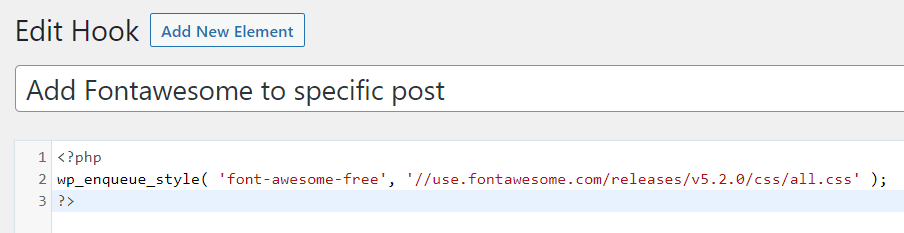
- Hook: Choose a hook location. For enqueuing CSS/JS you want
wp_head - Execute Shortcodes: Executes shortcodes in the content
- Execute PHP: Executes PHP code in the content
- Priority: Order the hook fires if there are multiple
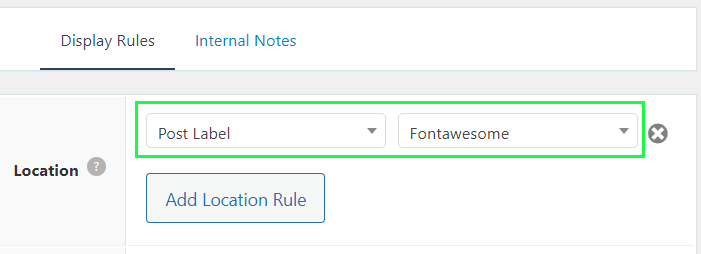
3. Set the display rules
This is where the magic happens. We need to choose the conditions where this hook will fire.
So it our case, find your custom taxonomy name from the drop-down. Then choose the exact taxonomy item to target.
In my case, I chose Post Label for the taxonomy and Fontawesome for the taxonomy item.

4. Test
Finally, just go to the front end of your site and load any page where you’ve applied your new post label. Make sure the CSS or JS file is being loaded as expected.
One way to do this is to right-click and view source. Then search for the path of your file to make sure it’s linked in the head. If it’s not, make sure to clear your browser cache, site cache and CDN cache.
Using PHP
If you don’t have one of these fancy schmancy themes, you can still use PHP to enqueue your scripts. Here’s the basic format.
- File path: https://cdnjs.cloudflare.com/ajax/libs/jquery/3.6.0/jquery.min.js
- Taxonomy Name: Post Label
- Taxonomy Item Name: jquery
The php would look like this:
// enqueues JQuery script on any post with Post Label = jquery

function enqueue_my_custom_scripts () {
    if ( has_term ( 'jquery', 'post_label' ) ) {  // check if your post has the 'jquery' post label
	wp_enqueue_script( 'cdnjs', 'https://cdnjs.cloudflare.com/ajax/libs/jquery/3.6.0/jquery.min.js', false );
    }
}

// Hooks your function into the wp_enqueue_scripts action
add_action( 'wp_enqueue_scripts', 'enqueue_my_custom_scripts' );

Code language: PHP (php)
And you can put as many different conditionals as you want inside the enqueue_my_custom_scripts function. Just add each inside it’s own if block, which matches against a different taxonomy item.
Important SEO Fix
One downside of using a taxonomy for conditional script-loading is that it requires you to set the taxonomy as public.
This means that by default WordPress will create an archive page for that taxonomy. And there’s no option to set archive=>'false' (like you would with a custom post type.
We don’t want this, since the archive has no value for a user. The taxonomy is purely for site functionality.
So instead you can use one (or both) of the following methods to remove any SEO impact.
No-Index the taxonomy archive
Most SEO plugins like Yoast and Rankmath give you the option to no-index any taxonomy or post type. We want to make sure this taxonomy doesn’t get indexed by Google.
Here’s how to do it in Rank Math:
- Go to Dashboard > Rankmath > Titles & Meta
- Click your taxonomy in the left column (usually at the bottom)
- Click the toggle to enable ‘Archive Robots Meta’
- Check the boxes: No-Index, No-Follow, No-Archive

Hide the Archive Page on the front-end
This step probably isn’t necessary because there’s no real way for users to find the archive once you no-index it. There won’t be any links to it from your pages or posts. But it’ll still be accessible via the URL unless your remove it.
Here’s a good solution via stackexchange:
add_action('pre_get_posts', 'kill_taxonomy_archive');
function kill_taxonomy_archive($qry) {

    if ( is_admin() ) return;

    if ( is_tax('tax_slug' ) ){
        $qry->set_404();
    }
}Code language: PHP (php)
Simply replace tax_slug with your own taxonomy’s slug. For me it’d be post_label.
All it does is check the current page is the archive for your custom taxonomy. If it is, it returns a 404 (page not found) error. The same as it would if there was no archive in the first place.
Wrapping Up
Hopefully by now you’ve successfully enqueued your stylesheet or script on specific pages using a conditional hook. It’s a good introduction to custom taxonomies and WordPress conditionals.
Don’t forget to no-index your taxonomy archives and/or use the hack above to hide them completely. There’s no reason to make them visible to users on the front end.
If you have questions, comments, or suggestions on how to expand this further, please let me know in the comments below!
Read this next: