
Most theme’s have customizer settings for controlling global styles such as background colors. But what if you want to override these defaults for specific pages?
Here’s how to change the background of a single page or post in WordPress.
What we’ll need:
- a simple CSS snippet
- The default WordPress editor (classic or Gutenberg)
There are two methods you can use to apply the CSS styles to specific pages. We’ll cover both of them.
Methods:
- Inline CSS (recommended)
- Use WordPress body classes (page ID)
Change the background color of a specific page using Inline CSS
Inline CSS is my preferred method for applying page-specific styles for a couple reasons:
- You don’t have to worry about finding the right class or selector to target
- You don’t bloat your global stylesheet with one-off styles
What is Inline CSS?
The term inline CSS refers to CSS code that is embedded in the HTML of the web page itself, rather than being loaded from an external stylesheet (e.g. style.css). It would be inefficient use inline CSS for all your sites CSS code, but it’s perfect for small snippets and one-off uses.
Inline CSS looks like this:
<style>
    /* CSS code goes here */
    body {
        background-color: lightblue;
    }
</style>Code language: HTML, XML (xml)
How to add inline CSS in Gutenberg
We’ll use the Custom HTML block which is included in the core version of WordPress.
To add a new custom HTML block, simply click the ‘+’ add block button, search for ‘HTML’ and click the block to add a new one.
Then all you need to do is write your rule between the <style></style> tags in your HTML block.
<style>
    /* CSS code goes here */
    body {
        background-color: lightblue !important;
    }
</style>Code language: HTML, XML (xml)
Note: Because this CSS is only embedded in the current page, we can use the !important modifier to make sure it overrides any global styles with greater specificity.
Change the background of a specific page using the the post-ID CSS class
As an alternative to inline-CSS, you can use the body classes that WordPress adds by default to every page on your website. If you use a tool like Chrome Inspector to look at the HTML code of your site, you’ll see something like this:

In WordPress, each page or post has a unique numerical ID. And that ID gets added as a CSS Class to the <body> element of the HTML document.
And because this CSS class will only every be used on one specific page, we can use to apply CSS rules to individual pages.
The formatting of the classname is a little different, depending on whether you’re working with a post or a page.
Here’s the instructions for each:
Post ID body class
For posts, the body class is formatted like this:
postid-xxxx
So you can write a CSS rule that looks like this:
.postid-3812 {
    /* your styles go here */
    background-color: #dddddd;
}Code language: CSS (css)
Page ID body class
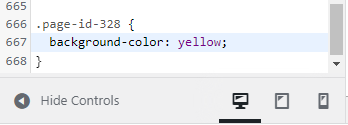
For pages, the body class is formatted like this:
page-id-xxxx
So to change the page’s background-color, the rule will be:
.page-id-xxxx {
    /* your styles go here */
    background-color: #dddddd;
}Code language: CSS (css)
Where to place this CSS code
There are a couple places you can put this code. For efficiency, you could actually use the inline-styles method above, to make sure the code is only loaded on this single page.
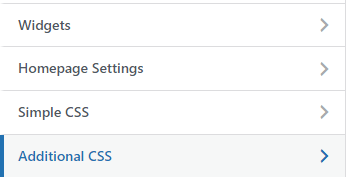
Otherwise, the best method is to add it to the WordPress customizer under Additional CSS.
CSS Color Codes
Adding colors to CSS is often confusing for beginners. That’s because there are multiple ways to represent the exact same color in CSS.
For example, here are three different ways you could add the color gold to CSS:
body {
    background-color: gold;     /* css color name */
    background-color: #FFD700;     /* hex code */
    background-color: rgb(255,215,0);    /* RGB */
}Code language: CSS (css)
Yes, these rules would all display the exact same color.
If you want help finding the CSS code for a specific color, you can use one of these free web color-picking tools:
- W3 Schools color picker
- HTML Color Codes
- Coolors (for finding complementary colors)
What if the background color didn’t change?
If you’ve added the CSS rules and your new background color isn’t being applied, here are the most common causes.
Not enough specificity
CSS uses a hierarchy called specificity to determine which styles will apply if there are multiple competing rules. Targeting an element by its type (e.g. body) is very low specificity. This means your rule might be overridden by a global style that has more specificity.
To fix this, you can try adding !important to the end of your CSS rule:
body {
    background-color: gold !important;
}Code language: CSS (css)
If that doesn’t work, proceed to the next troubleshooting steps.
Wrong CSS selector
If the selector you used in your CSS rule is wrong, the rule won’t be applied to the correct element. For example, if you used the wrong post ID, or forgot the period ( . ) before the class name.
It’s pretty easy to tell if this is the case because if you inspect the code on the front end, go to the body element and check the computed tab, you won’t see your rule being applied.
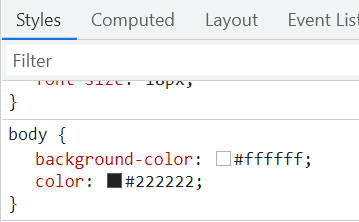
As you can see above, there’s no class-name in the rule that is styling our <body> element. This means your rule is using the wrong selector for targeting, or it isn’t formatted correctly.
A different element is controlling the background color
Most of the time, a pages background color is set on the body element. But this is not always the case, for example, your theme might have an outer-container element that covers the entire page and has its own background color.
In that case, any background you set on the body won’t be visible behind the child element.
The fix: You’ll need to find out which child element is actually setting the background color you see. This can be done using the developer tools extension in either Chrome or Firefox.
Here’s a quick crashcourse in Chrome Inspector, specifically for CSS development:
Summary & Additional resources
If you’ve made it this far, you should have two methods to change the background color of specific pages in WordPress.
Methods:
- Inline-CSS (using the custom HTML block)
- Body classes (postid-xxxx and page-id-xxxx)
For most scenarios, the inline css option is the best method. It’s easier to keep your CSS organized and should help keep your site loading faster as well.
I typically only use body classes for targeting specific categories, post types or post templates rather than individual pages.
Related articles on WordPress & Design
- The best visual CSS editors (they write the CSS for you)
- How to customize Gutenberg buttons with CSS
- Icon and Emoji list bullets with CSS
For more tutorials, make sure to subscribe on Youtube. And for exclusive WordPress site-building content, join the Email List.