

Anchor links are awesome. They make your content more scannable, help visitors find what they’re looking for, and can even boost your SEO and lower your bounce rate!
If you’re not using anchor links on your WordPress website or blog, you should strongly consider it. Here are the best methods to add anchor links in WordPress.
Check the examples below in our written guide, or watch this video tutorial ↓
And if you’re not sure what an anchor link is, below you’ll find a textbook example:
- Create anchor links in Gutenberg editor
- Create anchor links in Classic editor
- Create anchor links with Table of Contents Plugin
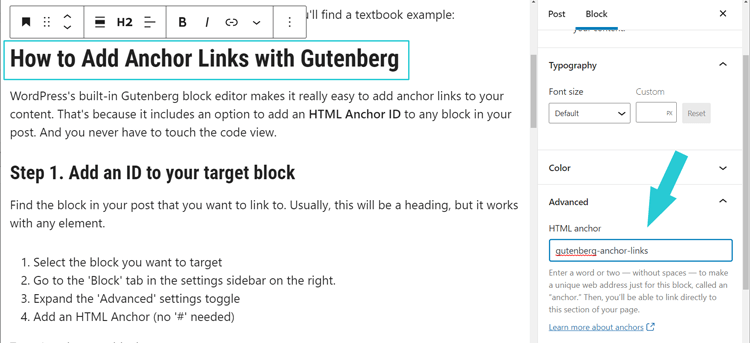
How to Add Anchor Links with Gutenberg
WordPress’s built-in Gutenberg block editor makes it really easy to add anchor links to your content. That’s because it includes an option to add an HTML Anchor ID to any block in your post. And you never have to touch the code view.
Step 1. Add an ID to your target block
Find the block in your post that you want to link to. Usually, this will be a heading, but it works with any element.
- Select the block you want to target
- Go to the ‘Block’ tab in the settings sidebar on the right.
- Expand the ‘Advanced’ settings toggle
- Add an HTML Anchor (no ‘#’ needed)
Step 2. Add your Jump Link
Next we need to add the anchor to a link. Select the text or button that you’d like to make a link and add the anchor ID with ‘#’ in front of it.
So if you were linking to an anchor named ‘my-anchor’ it would look like this:

Add Anchor Links in the Classic Editor
It’s no secret that I love Gutenberg blocks. But if you’re still using the classic editor, don’t worry. You can still manually add anchor links to your posts.
Step 1. Add the HTML Anchor ID
There are a few different ways to create your anchor targets:
- Edit the HTML
- Use a Plugin
Add an Anchor ID w/ HTML
- Select the element you want to add an anchor to
- Switch to the ‘text editor’ view
- Add the ID to the opening tag of the element (shown below)
<h2 <strong>id="your-anchor-goes-here"</strong>>Link to this heading</h2>Code language: JavaScript (javascript)Add an anchor ID with a Plugin
Advanced Editor Tools (formerly TinyMCE Advanced) adds a handy ‘anchor link’ tool to your WYSIWYG editor.
- Select the element you want to link to
- Go to Menu > Insert > Anchor
- Name the anchor ID
Step 2. Add the Jump Link
Go to the link that will jump to your anchor, and enter the ‘#anchor-name‘ (without quotes) in the URL target field.
Add Anchor Links with Table of Contents Plugin
A Table of contents plugin is a great way to add useful anchor links with minimal hassle. It does all the work for you, and lets visitors navigate even long-form content easily.
See Also: Setting up a conditional table of contents widget
The plugin will automatically scan your post headings and add anchor ID’s to the heading levels you specify. It can also dynamically insert the table of contents at the top of the post or in the sidebar. You can also insert it manually.
One of the best things about this approach is it’s set-and-forget. You don’t have to manually insert ID’s or create links. It’s all automatic.
Step 1. Install a ‘Table of Contents’ Plugin
There are several good free options available, and they’re all forked from the same codebase so the functionality is very similar.
Here are my favorites (in order):
Step 2. Configure the plugin settings
You’ll need to configure some basic plugin settings. Here are the most important ones:
- which heading levels to include: I usually use H2 & H3
- How to insert the TOC: You can either opt for automatic insertion at the top of the post, you can put it in a sidebar widget, or you can manually insert it in posts with a shortcode/block.
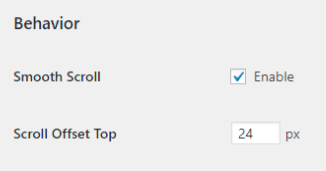
- Smooth Scroll / Scroll offset – most of these plugins have a ‘smooth-scroll’ option which will animate the jump to the anchor target. You can also set an ‘offset’ (in pixels) to accommodate a sticky header.
And that’s basically it. All your items in the table of contents will jump straight to the relevant section of your content.
Smooth-Scroll & Scroll Offset
Level-up your anchor links with animated scroll and better spacing. These CSS fixes work great regardless of which anchor-link method you use.
Smooth Scroll: If you’ve ever seen an anchor link that did an animated scroll down to the anchor target, then you know what smooth-scroll is. It’s a nifty upgrade to your links, but should be implemented appropriately because it can cause motion sickness in some people.
Scroll Offset: add extra margin to the top of your anchor target so isn’t stuck to the very top of the screen (or behind a fixed header).
How to add smooth scroll
There are Javascript plugins you can use, but I prefer a pure CSS solution for smooth scrolling.
CSS smooth-scroll with accessibility fix
html {
  scroll-behavior: smooth;
}

@media (prefers-reduced-motion: reduce) {
  html{
    scroll-behavior: auto;
  }
}Code language: CSS (css)
Note: This media query doesn’t have full browser support yet, so you can use a JQuery solution like this one for better coverage.
How to add Scroll Offset
Add a bit of margin to your scroll targets so they aren’t stuck to the very top of the screen.
/* offset of 50 pixels for any element with an ID attribute */

*[id] {
    scroll-margin-top: 50px
} Code language: CSS (css)
Alternatively, you could just target specific elements with an ID. Like this:
/* set a scroll offset for any H2 or H3 element with an ID */

h2[id], h3[id] {
    scroll-margin-top: 50px
} Code language: CSS (css)
Thank you so much for this video!! I was doing all these work arounds, I’m so glad you showed how to do the scroll-margin-top CSS rule and what exactly to type. This has saved me so much time. In fact I’ve tried to find this answer before, but was unable to find it this clearly explained. I’ll be visiting your website in the future and thank you again.